Introduction
I remember writing the initial version of this in my barracks room years back and that was well before I had taken any kind of steganography or cryptography classes of any kind, so this was truly just me having fun. As such, there are several parts I have revisited in the past several years to try and guard against things like frequency analysis and other basic issues I identified. I forget what the exact inspiration was to write this but I’m still glad I did because it was fun to write (although infuriating at times). And no, I am not currently using this to house any sensitive information so I feel comfortable sharing how it works on the web for others to look at.
What this script does is accept text entered in manually, line by line, or as a txt file and then converts it into something that looks like this:

I will break down how the scripts work down below if you want to manipulate it yourself, or just for those that are curious. To view the entire scripts, reference here for the encrypt file and here for the decrypt file.
Quick note on v2 (2025)
Before diving into this I will say I have found ways to break it if you know how the program is written. So, I rewrote this recently and went in a similar (yet completely different) direction with it. I do not see any way in which the new encryption could be broken outside of brute forcing the password, which, according to how I wrote it, will take time. A very, very long time. Feel free to take a look at the new version here.
How it works
My goal here was to put this through so many steps / layers it would be like peeling an onion - both in the sense of needing to peel off many layers and in that you will end up in tears trying to decrypt it. I broke this down into four main steps to try and give this explanation some structure, but it remains difficult to follow at times. And I’m saying that as the guy that wrote the script and this page, so best of luck.
Step 1: Creating a symmetric key
My first step was defining allowed characters in the text - this includes all lower / uppercase letters, numbers, and a good portion of the special characters too. This can be done with the string module and defining a variable housing all those characters with alphaDict=str(string.printable).
Since I don’t want to use just one key to encrypt every single image (that’s just not secure after all), let’s randomize the symmetric key:
list1=[char for char in alphaDict] #take the string and throw it into a list
numpy.random.shuffle(list1) #randomize our key

text="".join(list1) #and we have a new key once again
Now to generate a larger key that will hide the smaller key within it. Reading the comments line by line below will make more sense than me explaining it here in a paragraph, but basically I am using the value of pi to add random characters equal to each sequential number of pi in between each character of the key:
mp.dps = 150 #these two lines will calculate pi up to the number of digits we designate, here it is 150
pi = str(mp.pi)
pi=str(pi.replace(".","")) #we will only need the numbers for this

randomKey='' #this will end up being the large key at the end

for i in range(0,len(text)): #for range in every character in our randomized key:
    piNumber=int(pi[i]) #index pi with the the correlating key number (again, purely by index i.e. 0,1,2,etc)
    firstPart=""
    for j in range(piNumber): #using that number from pi (0-9)
        firstPart+=text[randint(1,len(text)-1)] #choose a random character from the key and fill in the space j number of times

    adding=firstPart+text[i] #combine the randomized part based off pi with the actual indexed location from the original key
    randomKey+=adding
When I was first making this I created the giveMeShortKey() function to ensure that everything was working correctly. This takes the large key that has been made with the random alphanumeric additions based on pi and returns the original randomized key that will be used to encrypt and decrypt the data. What that looks like is the following:
#again, this is just reverse engineering the process we just did - feel free to skip these lines of code
def giveMeShortKey(randomKey,text): #"randomKey" is what was just generated, "text" is the actual original key (but isn't used here)
    myAnswerKey=""

    keepCount=-1
    for numberI in range(len(pi)): #uses the same pi up to 150 digits we calculated earlier
        number=pi[numberI] #so cycling through every number in pi
        if numberI<=len(text)-1: #this means so long as we aren't exceeding the length of the original (short) key
            keepCount+=int(number)+1 #we are adding the number we are currently indexed at plus the one space for the actual key value

            myAnswerKey+=str(randomKey[keepCount]) #the keepCount is a cumulative number value that is used to identify what part of the large key to index
    return myAnswerKey #short key
To compare and contrast the two keys visually, here are the first thirty or so characters of the two side-by-side:

Looking at the beginning of each key that was generated we can see the long key which will actually be saved in the image is 545 characters long and the reduced key is 95 characters. The large key is generated from the small one by inserting random characters equal to the value of pi for each sequential character by its indexed value in that key.
What that means is we see 3 random characters in the long key, then the ], which was the first character in the short key. To see the next character n from the short key there is the one random character after the ] in the long key. You can begin to see the pattern now of using pi (3.1415926…) calculated to 150 decimals to perform this function. Reference the underlined green characters and it should make sense.
This ends the portion that creates the key, and how it is decrypted later on. This large key, however, needs a home within the image somehow and I discovered that you can in fact add text data to the end of jpeg images when opening the image in a text editor. Weird, right? This is a great way to conceal the key against a human eye - after all this is what is looks like even when you do open the image in a text editor (the key is highlighted at the bottom for one of my test images):

No one I know of would think to open an image in a text editor like Notepad and scroll down to the bottom and try and find something out of place. Machines, however, do notice this. Submitting that same image to a free “photo forensics” site that included features like string extraction revealed the following:
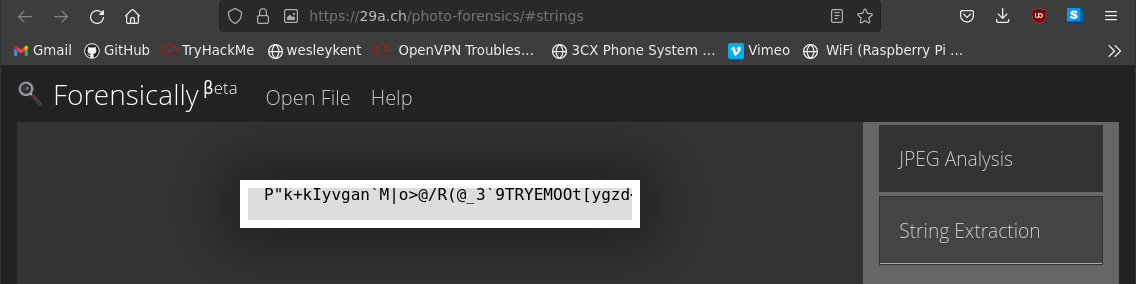
So it can be found out that way. I have no issue with this, however, because this is only one of many steps. Even if you find this you would need to know that it has to be reduced somehow, figure out what to reduce it by, and then know where and how to use the reduced key you’ve uncovered.
Step 2: Changing the text into numerical values we can work with
The list you see below called listToEncrypt is a list of the data that will be stored in lines. I will cover this later, but the information you enter can be done so manually within the shell or it will read the data from a text file you give it. In both situations the list will simply store it as one line being its own element within the list.
This below loop will perform a basic replacement of the plain text into it’s ciphertext by replacing each LETTER with a NUMBER that is found by indexing its location within the short key. This means instead of one of the lines within the main list looking like 'hello' it will now appear as something like [01,58,37,37,22] instead. That loop is seen below:
#convert to numbered (indexed)
numberedText=[]
for line in listToEncrypt:
    adjustLine=[]
    for char in line:
        try:
            adjustLine.append(myAnswerKey.index(char)) #don't forget "myAnswerKey" here is the SHORT key
        except ValueError: #this will only happen when you try to use a key not allowed in the alphaDict
            pass #i.e. if the letter "e" was not defined it would result in the text "red" becoming "rd" when encoded and later decoded

    numberedText.append(adjustLine)
We will use these numbers in the lists to embed them into the image as RGB values later on, but they will be manipulated in a couple other ways first.
Step 3: Manipulating the numbers into their RGB values
Alright, let’s get into the actual math and code that will produce that headache inducing image you first saw at the beginning of this page.
To begin, the RGB values we create are stored within a numpy array that will later be used to generate the jpeg image. Before we can even begin modifying the array into the appropriate RGB values we first need to calculate the total height as well as the width of the longest line. This is done with:
maxWidth=0
maxHeight=len(numberedText)+1

for Line in numberedText:
    if len(Line)>maxWidth:
        maxWidth=len(Line)
Now to initiate the numpy array with each spot containing 3 values of zeroes (like you would see for R,G,B):
ratio=16
data = numpy.zeros((maxHeight*ratio, maxWidth*ratio, 3), dtype=numpy.uint8)
To cycle through all the characters we will need to encode the loop appears like this:
for y in range(maxHeight):
    for x in range(maxWidth):
        try:
            num=(numberedText[y][x]*2)+44 #numberedText list length is appx. 100
        except IndexError:
            num=0
That exception will return “0” for the RGB value, which will be used to designate the end of the line when you decrypt the image.
This is where the editing of the array gets complex, and I will cover how it works with an image first as that’s the only way I’ve had success in explaining this, and then discuss the code behind it afterwards. Before you get confused, here is what a single block to encode one character might actually look like:
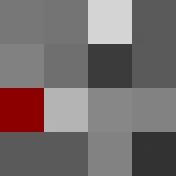
Let’s look at how this actually breaks down in a more comprehensive, and colorful, way:
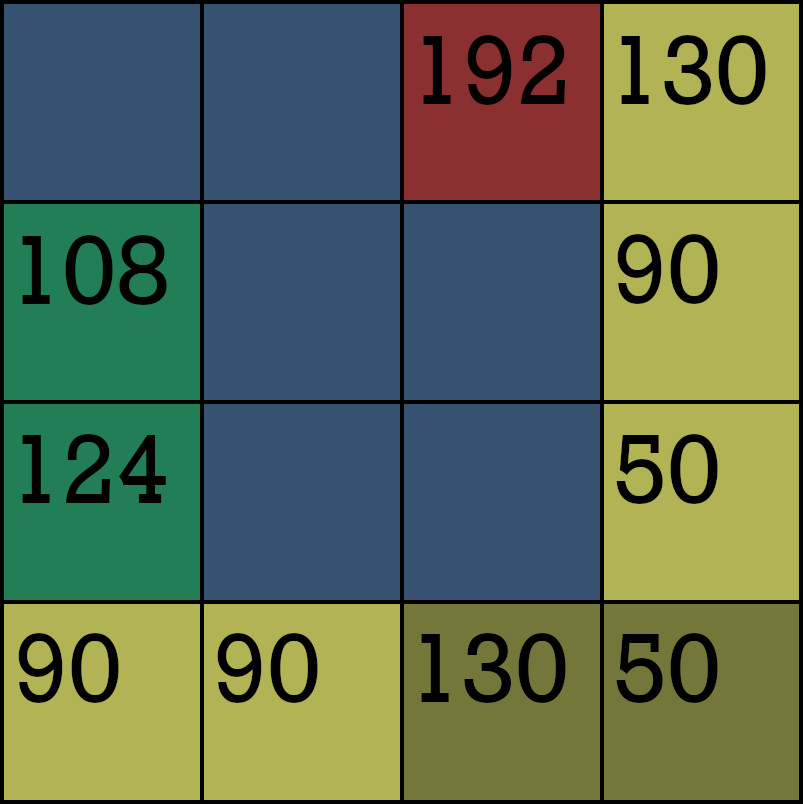
Those numbers are meaningless right now, I understand. To explain each of what the colors represents:
The mustard-looking squares on the bottom right denote where to look in the top left 3x3 grid. Each of the more yellow tiles will have a similar RGB value of 50, 90, or 130 - only we know which ones to look for. Here, the left mustard-square has a RGB value of 130 and the right is 50. Subtracting 50 from both and dividing by 40 we get a location of (2,0).
This will tell us which square to find within the 3x3 grid - in this case that has been highlighted as the red square in the image. Knowing this location it will attempt to go to the next column, but can’t so it will go to col=0 and use the remaining unused rows, which are row=1 and row=2. These locations have the green background in the image.
Knowing where to look for the main spot at (2,0) gives us an RGB value of 192, and the other two locations give RGB values of 108 and 124. The latter two will be subtracted from one another to give us an absolute value of 16, which is then added to 192 from the red square.
This math will blow your mind: 192 + 16 = 208.
This example value that was generated was calculated previously using the num=(numberedText[y][x]*2)+44 to index our answer key and perform some addition and multiplication. Knowing this, it is safe to assume that by reversing engineering the above 208 - 44, divide by 2, gives 82. This means that whatever value is at the indexed location of 82 in the short key we generated ages ago represents this character.
Now for the code behind this. Inside that same for loop I mentioned before, each of the 16 squares within that 4x4 block are defined below, and I have explicitly broken down how each row looks like so you can easily follow along:
#layer1
num1=randint(15,230)
num2=randint(15,230)
num3=randint(15,230)
num4=50+(randint(0,2)*40)
#layer2
num5=randint(15,230)
num6=randint(15,230)
num7=randint(15,230)
num8=50+(randint(0,2)*40)
#layer3
num9=randint(15,230)
num10=randint(15,230)
num11=randint(15,230)
num12_adj=50+(randint(0,2)*40)
#layer4
num13=50+(randint(0,2)*40)
num14=50+(randint(0,2)*40)

#below two lines chooses the random location for just this character on this 4x4 grid
use1=randint(0,2) #need to keep these two numbers for later on use
use2=randint(0,2) #need to keep these two numbers for later on use

ONE=(use1*40) #manipulating it into a higher RGB value
TWO=(use2*40) #manipulating it into a higher RGB value

num15_adj=50+ONE #will determine where to look for the correct square
num16_adj=50+TWO #will determine where to look for the correct square
Now that we have these RGB values let’s save them into the data array that will become the image. Again, this has been broken down by row so you see exactly what is happening:
data[(y*(ratio)):(y*(ratio))+(ratio/4), (x*ratio):(x*ratio)+(ratio/4)]=[num1,num1,num1]
data[(y*(ratio)):(y*(ratio))+(ratio/4), (x*ratio)+(ratio/4):(x*ratio)+(ratio/2)]=[num2,num2,num2]
data[(y*(ratio)):(y*(ratio))+(ratio/4), (x*ratio)+(ratio/2):(x*ratio)+int(float(ratio)/float((float(4)/3)))]=[num3,num3,num3]
data[(y*(ratio)):(y*(ratio))+(ratio/4), (x*ratio)+int(float(ratio)/float((float(4)/3))):(x*ratio)+(ratio)]=[num4,num4,num4]

data[(y*(ratio))+(ratio/4):(y*(ratio))+(ratio/2), (x*ratio):(x*ratio)+(ratio/4)]=[num5,num5,num5]
data[(y*(ratio))+(ratio/4):(y*(ratio))+(ratio/2), (x*ratio)+(ratio/4):(x*ratio)+(ratio/2)]=[num6,num6,num6]
data[(y*(ratio))+(ratio/4):(y*(ratio))+(ratio/2), (x*ratio)+(ratio/2):(x*ratio)+int(float(ratio)/float((float(4)/3)))]=[num7,num7,num7]
data[(y*(ratio))+(ratio/4):(y*(ratio))+(ratio/2), (x*ratio)+int(float(ratio)/float((float(4)/3))):(x*ratio)+(ratio)]=[num8,num8,num8]

data[(y*ratio)+(ratio/2):(y*ratio)+int(float(ratio)/float((float(4)/3))), (x*ratio):(x*ratio)+(ratio/4)]=[num9,num9,num9]
data[(y*ratio)+(ratio/2):(y*ratio)+int(float(ratio)/float((float(4)/3))), (x*ratio)+(ratio/4):(x*ratio)+(ratio/2)]=[num10,num10,num10]
data[(y*ratio)+(ratio/2):(y*ratio)+int(float(ratio)/float((float(4)/3))), (x*ratio)+(ratio/2):(x*ratio)+int(float(ratio)/float((float(4)/3)))]=[num11,num11,num11]
data[(y*ratio)+(ratio/2):(y*ratio)+int(float(ratio)/float((float(4)/3))), (x*ratio)+int(float(ratio)/float((float(4)/3))):(x*ratio)+(ratio)]=[num12_adj,num12_adj,num12_adj]

data[(y*ratio)+int(float(ratio)/float((float(4)/3))):(y*ratio)+(ratio), (x*ratio):(x*ratio)+(ratio/4)]=[num13,num13,num13]
data[(y*ratio)+int(float(ratio)/float((float(4)/3))):(y*ratio)+(ratio), (x*ratio)+(ratio/4):(x*ratio)+(ratio/2)]=[num14,num14,num14]
data[(y*ratio)+int(float(ratio)/float((float(4)/3))):(y*ratio)+(ratio), (x*ratio)+(ratio/2):(x*ratio)+int(float(ratio)/float((float(4)/3)))]=[num15_adj,num15_adj,num15_adj]
data[(y*ratio)+int(float(ratio)/float((float(4)/3))):(y*ratio)+(ratio), (x*ratio)+int(float(ratio)/float((float(4)/3))):(x*ratio)+(ratio)]=[num16_adj,num16_adj,num16_adj]
At this point we have only defined the outside right and bottom values and filled in the remaining squares with random values. We still need to define those 3 blocks with data about the encoded character within that 3x3 grid in the top left. Using the use1 and use2 values randomly chosen previously we can find the other row and two columns needed to work with, and this is the function that will do just that:
#now to find other spots
def get_spots(use1,use2): #use1=x,use2=y
    if use1+1>2:
        new_row=0
    else:
        new_row=use1+1

    given=[0,1,2]
    given.pop(use2) #works only once by index
    new_columns=given[:]

    return new_row,new_columns

new_row,new_columns=get_spots(use2,use1)
Now we need to perform that subtraction / addition that was hinted at previously with the two green tiles from the colorful image, which are the same as the coordinates from the new_row and new_columns we just calculated. The difference between the two RGB values, as well as the where the split happens, are both random. What’s neat about this is the same character could be encoded as main: 234, green_tile_#1: 132, green_tile_#2: 112, total_difference: 20 or as main: 248, green_tile_#1: 204, green_tile_#2: 170, total_difference: 34 and still give the same character once decoded. And don’t forget, these three values are randomly bouncing around that 3x3 grid for every single character in the text you are encoding. All that happens here below:
#choose difference that will exist between these new two squares
choose_apart=random.choice([i for i in range(9,40) if i%2==0]) #gives even #, 10-40
choose_difference=random.choice([i for i in range(4,choose_apart-3)]) #choose the difference

doesntmatterthenumber=randint(55,190) #number to manipulate

for i in range(len(new_columns)):
    new_col=new_columns[i]
    if i==0:#first item
        new_col_one_rgb=doesntmatterthenumber+choose_difference
    else:#second item
        new_col_two_rgb=doesntmatterthenumber-(choose_apart-choose_difference)
Just as before, that data needs to be written to the array now, overwriting whatever RGB value previously held its place:
data[(y*(ratio))+(4*(new_row)):(y*(ratio))+(4*(new_row+1)), (x*ratio)+(4*(new_columns[0])):(x*ratio)+(4*(new_columns[0]+1))]=[new_col_one_rgb,new_col_one_rgb,new_col_one_rgb]
data[(y*(ratio))+(4*(new_row)):(y*(ratio))+(4*(new_row+1)), (x*ratio)+(4*(new_columns[1])):(x*ratio)+(4*(new_columns[1]+1))]=[new_col_two_rgb,new_col_two_rgb,new_col_two_rgb]
Now to save the spot on the image that was the red tile, or the one that we are pointed from the RGB values at tiles 15 and 16. If the initial num was zero then we need to ensure that it is reset before writing to the location at (use1,use2) - don’t forget that the “0” indicates the end of that line, otherwise we subtract the difference I alluded to earlier aka the choose_apart variable:
if num==0:
    new_num=0 #otherwise subtraction seen below might give a negative #
else:
    new_num=num-choose_apart #actually a character being encoded, not the end of the line

data[(y*(ratio))+(4*(use2)):(y*(ratio))+(4*(use2+1)), (x*ratio)+(4*(use1)):(x*ratio)+(4*(use1+1))]=[new_num,new_num,new_num]
Step 4: Generating an image from the array
That was a lot, but we are virtually done at this point. All that remains now is to create an image from that array using the PIL module:
img = Image.fromarray(data, 'RGB')
img.save(desktopPath+"\\"+this+'.jpg', format='JPEG', subsampling=0, quality=100)
And don’t forget to append the long key to the image when opened as a text file:
pleasework=open(desktopPath+"\\"+this+'.jpg','a')
pleasework.writelines(['\n'+str(randomKey)])
pleasework.close()
The rest of this script is the text-based interface that controls how to interact with the script and ensures you aren’t overwriting files, etc. I won’t cover that because it has nothing to do with the encryption process, but you can still see it in the full script from above.
Adding a misdirect
If you saw the initial image on this page then you might be wondering where all the red comes from in the sea of grayscale blocks. I did not cover that in the explanation above because it has nothing to do with the actual cipher - it is a complete misdirect.
I simply added a single red pixel block per 4x4 grid of each character, as well as the bottom layer of all red. This was inspired by that old “what’s black, white, and read all over” joke, but it is really just meant to throw people off. After all, every block has one and it’s the only distinguishing RGB color. The very bottom four lines are some shade of red, the 1st and 3rd layers are all even numbers, 2nd and 4th are odd. The single pixel blocks scattered throughout the rest of the image are all divisible by nine (9) as well, so instead of trying to make the deception completely obscure I tried to give someone something to find. I just think it’s funny because you can find legitimate patterns in those red blocks but they are utterly meaningless. Hopefully this would confuse anyone from identifying the actual markers or patterns used to encode the data.
Decrypting the image
Unsurprisingly, to decrypt the image you need to do all the steps in reverse - shocking, right? Even getting that setup correctly was an absolute pain but the process has been ironed out by now. I won’t cover that here since it would be redundant, but you can enjoy some of the frustrated comments of me trying to figure out how to get it working on the full script linked at the beginning of this page. It is fairly well documented so I trust you’ll be able to follow along.
The downside to this encryption is that anyone with the know-how could read any data stored this way. Everyone knows how RSA works but you still can’t reasonably brute-force the private key when using large enough key sizes (for now, at least). That being said, if a random person used this on their personal device I find it highly unlikely anyone would be able to crack it. But I welcome anyone to challenge that and try, let me know if you are able - I would love to hear how you did it.
Final thoughts
As for why choosing to encode the data into an image… well it just makes things more difficult. Coming at this cipher with no knowledge of how it works you would be able to identify some trends in the RGB data (the limiting value of each line, the RGB values that form the “L” on the bottom right of the box, the red RGB blocks that are meant to deceive, etc), but again, nothing that you would look at and think “oh, that’s how this works”. Having every letter be a different RGB value is just the cherry on top - I hope that would throw off any attempts at frequency analysis.
Again, if you have made it this far, then congratulations are in order. This was a long one. Feel free to download the encrypt / decrypt scripts and mess around with them as you wish. Whether you just want to test them out yourself or manipulate them further, go for it. You only need Python v2.7 with a few modules already installed, and if I remember later I’ll also make this into its own executable later on. Have a good one.