Introduction
This page explores a combination of two ideas I had - the first was capturing wireless traffic over a wireless interface and the second to be able to remotely manage and access the packet capture files that are generated. This is naturally done using a Raspberry Pi powered using a UPS so it can be left on its own for a short period.
Hardware
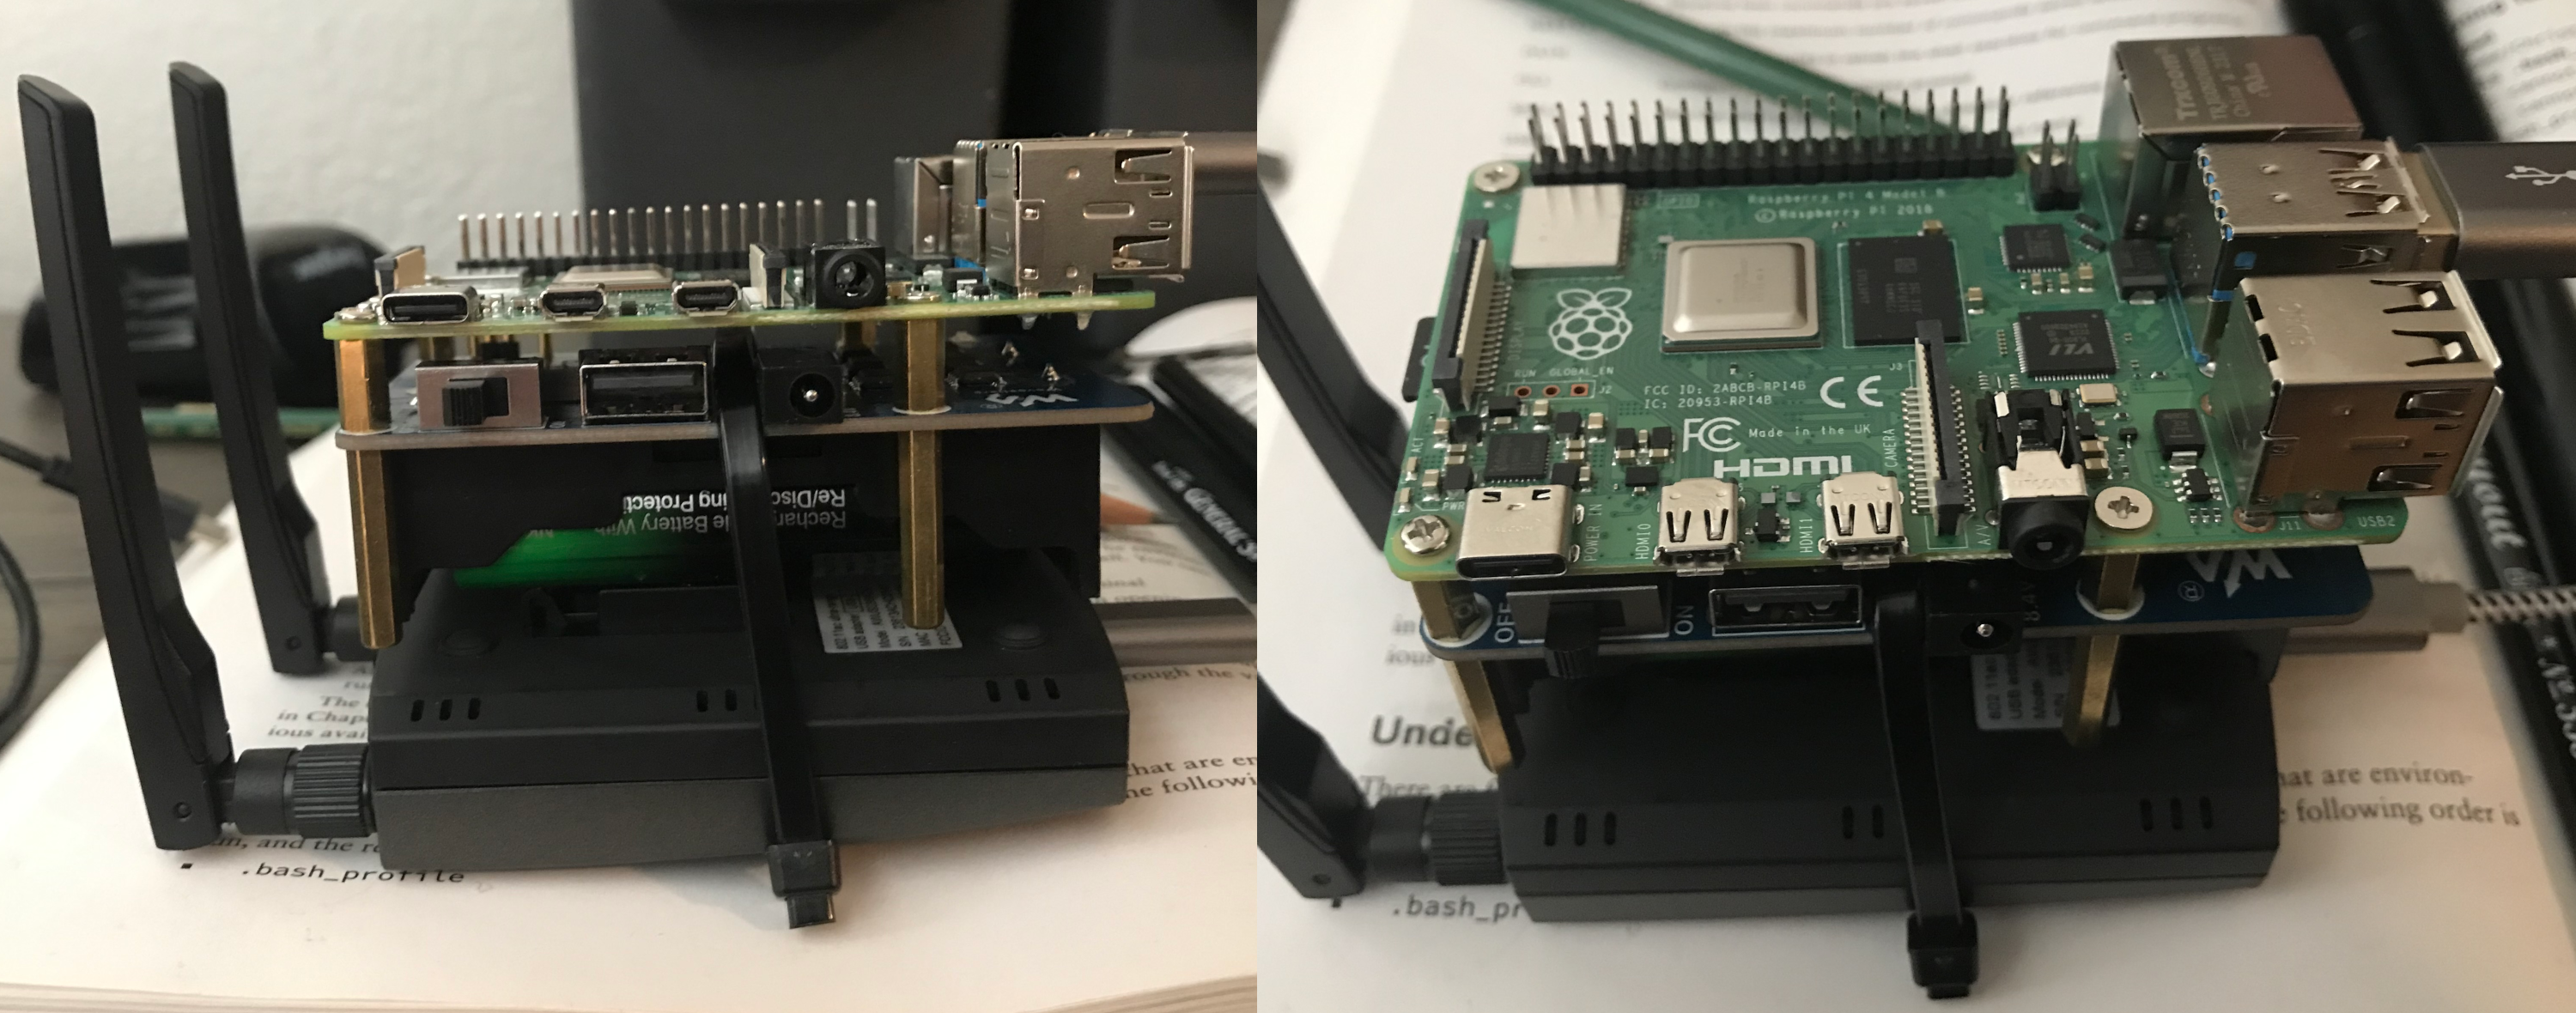
Let’s very briefly cover the hardware needed for this project:
- 1x RPi 3 B+ (or the 4 - just keep in mind power consumption and cost)
- 1x Waveshare UPS Hat (retrospectively, this broke on me so maybe choose another one)
- 2x 18650 batteries - you can get these from anywhere at any capacity, you get what you pay for
- 1x USB Dual-Band Antenna (you can get a cheaper one, this is just the one I am using)
- 1x Short Male USB C to Male USB (Type A) cable
Software
OS
I went the Kali Linux route since it already has many of the tools needed for pentesting / packet sniffing and can be repurposed more easily down the road. Using the RPi Imager, navigate to Other specific-purpose OS, then select the Kali Linux option.
Initial config
- Start off the right way:
sudo apt updateandsudo apt upgrade - Modify the hostname, locale, keyboard layout, etc etc as desired. Also add a new user with the
useraddtool and disable the default Kali account withusermod -L kali, default credentials arekali:kalifor when you first login. For the new user, use:sudo useradd -m theotheronesudo passwd theotheronesudo usermod -aG sudo theotherone
- A desktop is not needed for this project and since it is battery powered, let’s limit the resources that are being used by booting to the console only:
sudo systemctl set-default multi-user - Reboot:
sudo reboot - Also, for future reference the user account I created for this example is called
theotheroneand the hostname isdontmindme
Quick note on the wireless USB antenna you are using
I already listed the antenna I am using but there are countless out there you can find (and for cheaper). Regardless of the Wi-Fi dongle in use, it is unlikely to work from the start. Welcome to Linux. Use lsusb or dmesg to look at what drivers you will need to install for the USB device to work on the system.
Specific to what I am using and the Kali Linux OS, the following driver worked for me: sudo apt install realtek-rtl88xxau-dkms. Alternatively, look to download the aircrack-ng zip file for it on github directly, unzip it, and then make, sudo make install. I was having issues using the git install and wget commands for some stupid reason, so you can also download it to another PC, start a web server there, and then curl it over to the RPi.
Configuring the Ad Hoc network
If this wasn’t already clear, the RPi is supporting a total of two wireless interfaces that will be used for this - the integrated Wi-Fi chip and the external USB antenna. The latter will be used to collect network traffic while the former will be used for remote access and management of the Raspberry Pi, including executing many of the commands that will be discussed later.
First off, identify what interface is which - for whatever reason the USB antenna loads as wlan0 while the RPi’s wireless interface is wlan1. Not sure why, but confirm before continuing.
Install the following: sudo apt install iw dnsmasq hostapd. Now configure a bash script that will be used to initialize your adhoc network at boot: nano adhoc.sh
#!/bin/bash
sudo ip link set wlan1 down
sudo iw wlan1 set type ibss
sudo ip link set wlan1 up
sudo iw wlan1 ibss join AdHoc4Pi 2437
sudo ip addr add 169.254.1.1/16 dev wlan1
sudo systemctl restart dnsmasq
sudo systemctl restart hostapd
Note that wlan1 may be different for you, and the AdHoc4Pi is whatever network name you wish. The 2437 is just a recommended frequency on the 2.4 Ghz band - adjust as needed. The part that you can modify is the ip address and network mask. I would recommend keeping it as is with an APIPA address and the network mask just keep that the same unless you are really partial to another subnet…
Now make the file executable with chmod +x adhoc.sh. Edit this file as follows: sudo nano /etc/dnsmasq.conf
interface=wlan1
dhcp-range=169.254.1.2,169.254.255.254,255.255.0.0,24h
sudo systemctl enable dnsmasq
IF you chose to change the subnet mask in the previous conf file then you will need to adjust the dhcp range accordingly. This is why I recommend not changing anything, one of these files is more prone to having a mistake.
The following configuration file will detail the settings for the network: sudo nano /etc/hostapd/hostapd.conf
interface=wlan1
driver=nl80211
ssid=AdHoc4Pi
channel=6
hw_mode=g
auth_algs=1
wpa=2
wpa_key_mgmt=WPA-PSK
wpa_passphrase=yougettochoosethis
wpa_pairwise=CCMP
wpa_group_rekey=600
ieee80211n=1
wmm_enabled=1
country_code=US
Again, this may need to be modified. The channel number needs to correlate with the previously mentioned frequency, the network name is the same as before, you choose a password, and the driver should not need to be changed so long as you are using the RPi’s wireless interface.
Edit the /etc/default/hostapd to account for the file you just created:
DAEMON_CONF="/etc/hostapd/hostapd.conf"
And now run:
sudo systemctl unmask hostapd
sudo systemctl enable hostapd
sudo systemctl start hostapd
This should have gone off without issue, if not make sure you didn’t mistype something. I know I did the first time.
There is one other file that needs edited before we can test this out at /etc/network/interfaces.d/wlan1:
allow-hotplug wlan1
iface wlan1 inet manual
From here the crontab needs to be configured to run that bash script we wrote earlier. Note this is not the crontab for the regular user for your system, so use sudo crontab -e and insert the following line of code:
@reboot /bin/sleep 60; /usr/bin/sudo /home/theotherone/adhoc.sh
To no surprise, give it a reboot and try it out. From a separate device (for me this was my Windows laptop), turn on your Wi-Fi and look for the network to show up there. There are several things to look for:
- After connecting to the AdHoc network you should see a ‘connected but no internet’ which is a good sign
- Confirm you have been assigned an IP address from the dhcp server you configured previously by running
ipconfig /alland look for something in the range of169.254.x.x. You can follow this up by trying to ping the default gateway of this network (which is just the RPi) at169.254.1.1 - If this isn’t working then check one of the many configuration files that probably have a single typo, and try manually running the bash script to see what error messages pop up. Just go through the troubleshooting process until you determine the issue. Running
ifconfigon the RPi will tell you if thewlan1was correctly configured with that169.254.1.1address.iwconfigwill let you know which wireless interface is which - If you can connect and ping the gateway, try ssh’ing in and hopefully it works out
Configuring the USB antenna
As I mentioned in the beginning, installing the drivers for your antenna will be specific to it. If you have the same one I used follow those steps, otherwise refer to the internet and the manufacturer.
Another quick step - create a text file called keep_this.txt in your new user’s home directory and copy the following into it:
To scan for wireless networks:
-nmcli dev wifi


To begin traffic capture:
-sudo airmon-ng check kill
-sudo airmon-ng start wlan0 <channel ID>
-sudo tshark -i wlan0 -w /home/theotherone/captures/capture.pcap


To transfer over:
-sudo chmod -R 777 ~/captures/* (command runs as sudo, makes downloading them not possible without this)
-python3 -m http.server 8888


Wireshark tip:
-Filter using 'wlan.addr==xx.xx.xx.xx.xx.xx'
This is a list of useful commands that will be used to identify access points, configure the wireless interface to promiscuous mode, start collecting traffic, and more. This will all be printed out whenever you, the user, enters debrief in the shell. In order for that to work out we need to set up an alias by editing the user’s ~/.bashrc file to include: alias debrief='cat /home/theotherone/keep_this.txt'. Since some might say I can be forgetful (I mean, how would I remember?), I also edited the welcome message for whenever a user first logs in to the system to display the following message (edit the /etc/motd file):
++++++++++++++++++++++++++++++++++++++++++++++++++++++++++++++++++++++++++++++++++++++++++

To view useful commands associated with this RPi project, enter 'debrief' at the terminal.

++++++++++++++++++++++++++++++++++++++++++++++++++++++++++++++++++++++++++++++++++++++++++
Okay, with that out of the way go ahead and create a directory to house all of the packet captures at ~/captures and give it 777 permissions. That’s all that is needed for this step, the rest of this page I will go through an actual example of collecting some traffic from a network I set up.
Looking at how this would actually be implemented
Assuming everything has been assembled and configured correctly, let’s say you have a target network somewhere and can leave an inconspicuous looking item (the RPI) for anywhere from 12-24 hrs. Once the RPi has been turned on, it will go through its entire set up process and run that bash script which will start the ad hoc network we will remotely connect to. You will still need to be nearby to initially ssh in, designate a target network, and start tshark, but afterwards you could leave the area altogether and return at a later time.
Once it is turned on, you connect to the AdHoc4Pi network wirelessly. After ssh’ing in you first need to identify your target network. There are many different tools out there, let’s just go with the nmcli dev wifi one (keep in mind the debrief command which will help you throughout all of this). Running this we can see the target network that is relatively close to our RPi - the old faithful MoldarkNet I’ve used in other videos. Information we need here is the SSID (of course) and the channel it is running on. In this scenario here is what that command showed me:

Let’s configure our wireless interface in monitor mode:
sudo airmon-ng check kill
sudo airmon-ng start wlan0 <channel id>
Now to actually capture some wireless traffic: sudo tshark -i wlan0 -w /home/theotherone/captures/capture.pcap. Now that this is running the RPi can be left as is for as long as it has battery power. Quick note - in some cases only starting the airmon-ng tool will create a new wireless interface called wlan0mon. An ifconfig will show whether or not that happened, adjust accordingly. Also, I wouldn’t be too worried about accidentally corrupting the file in the event the battery suddenly dies - I ran the RPi until the battery died on its own and the file was still readable.

Collecting that packet capture file
Recovering the physical RPi device will of course allow for direct access to the pcap file, but the whole point of the ad hoc network we previously configured was to be able to anonymously, and remotely, recover that data. Here’s how we can remotely connect and collect that data.
- Connect to the network over Wi-Fi
- SSH in to the device which is the same as the default gateway of that network at
169.254.1.1 - That
tsharkcommand is run assudoand the file permissions will need to be modified. Navigate to the~/captures/folder and execute the following command:sudo chmod -R 777 * - Use
scpor start a web server to download the traffic. I am partial to the web server route, so after logging in executepython -m http.server 8888. Might need to alter parts of this to bepython3instead ofpython, or useSimpleHTTPServerinstead ofhttp.server. On your local machine navigate tohttp://169.254.1.1:8888and download the pcap file. Ideally you would want to recover the RPi, this is only if you are unable to.
Analyzing the traffic
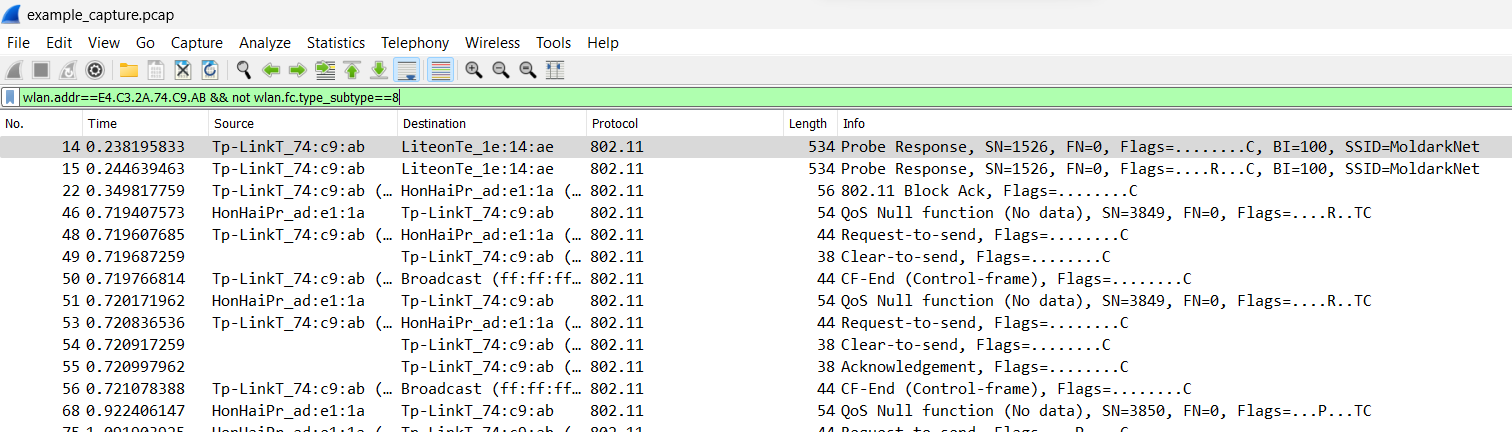
The tool I am using to analyze the traffic is of course Wireshark. No doubt there will be traffic from other networks as well and since I am only interested in my own MoldarkNet network, let’s introduce the following filter: wlan.addr==xx.xx.xx.xx.xx.xx (adjust the MAC address of course). Alternatively you can use wlan.bssid==xx.xx.xx.xx.xx.xx. Reviewing this traffic can help paint a picture of the type of traffic being sent across the network and the actions of particular hosts.br>
Conclusion
I think that about sums it up. If you are having trouble configuring the ad hoc network really look at each file, line by line to find where the error is. It isn’t always obvious and may take some help from the internet. This is completely unrelated, but look at this cool old laptop I got at an estate sale:
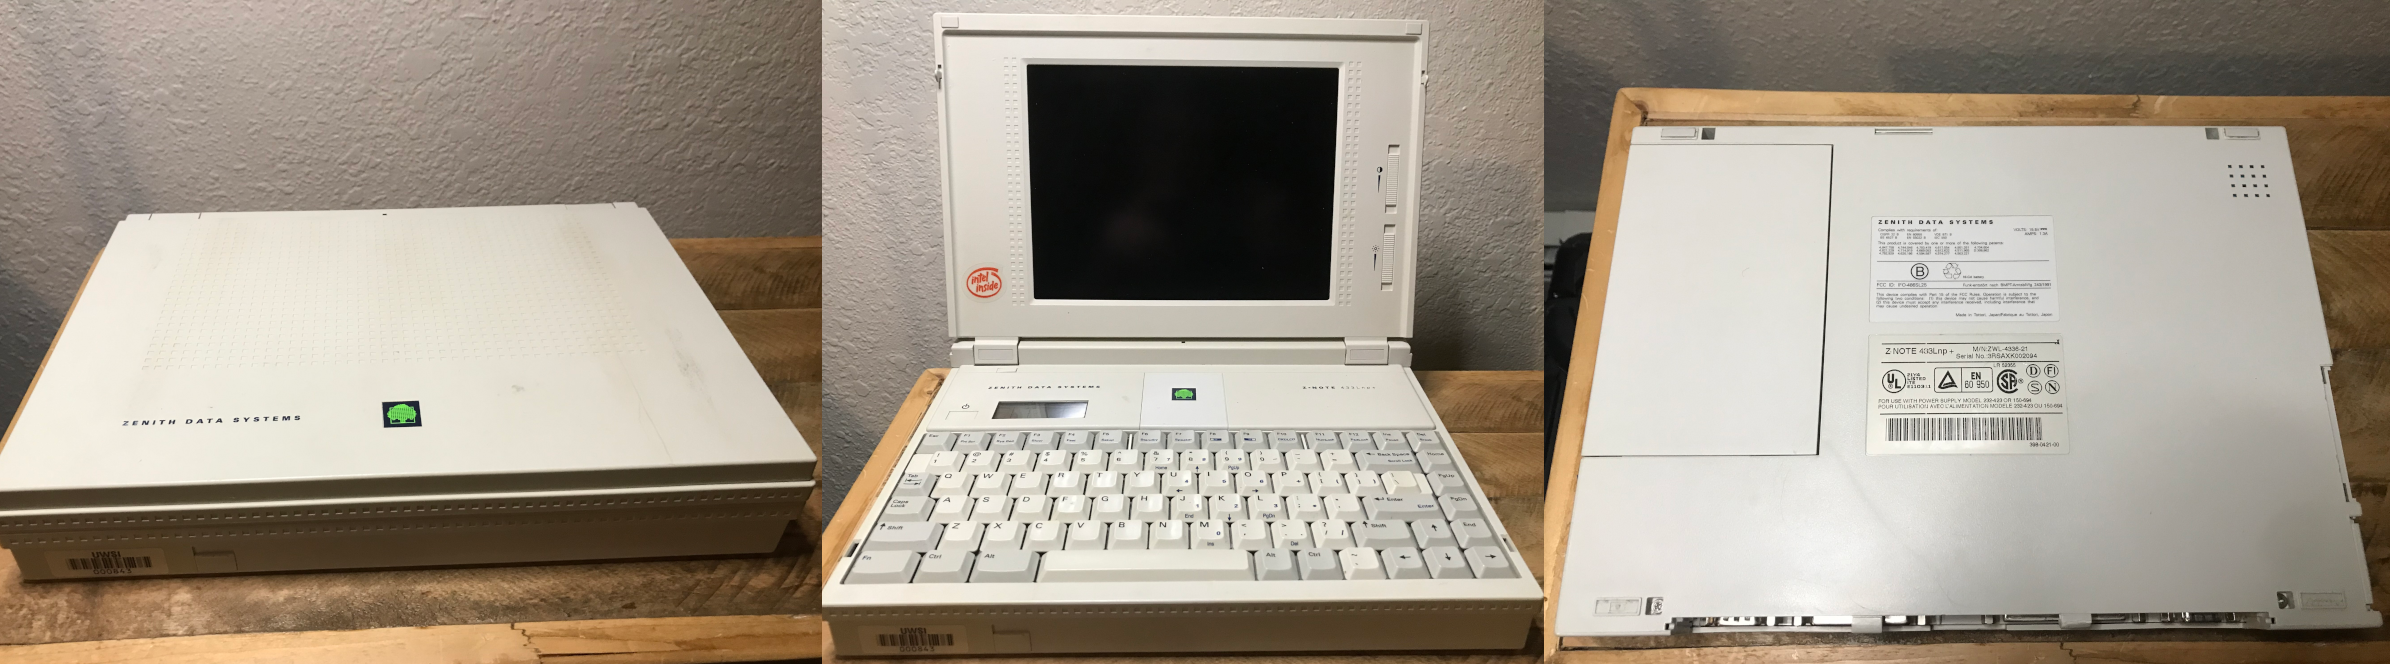
It is a Zenith Data Systems laptop, model Z-note 433Lnp+. As best I can tell this laptop is 31 years old. The company that sold these was acquired in 1996, two years before I was even born, and boasts an impressive 2 Mb of RAM. I have scoured the internet for any documentation or manuals on this device and come up completely empty, it’s really just that old I think. I tried numerous search engines, ChatGPT, internet archives, but nothing worked. I spent about two hours searching for a power supply for this thing since it did not already have one and I could only find one that might work - the connector and voltage are right, but it is .3 Amps low. We’ll see, for the life of me I could not find the exact power supply. The reason I think this device is 31 years old is because of this Washington Post article from 1992 I found while searching for manuals. Anyway, hopefully the power supply works and I can get it up and running. I know this is completely unrelated to this page, but I think it’s cool.