Introduction
One step in the term process for users is removing them from scanners they had been added to in the past. A simple step, yes, but when you have multiple locations with countless MFP printers, it adds up quickly. Reviewing each one would be a pain and I figured it would be easier to find a way to automatically login to the web interface, download the address book, and then parse through the data looking for scanners that need to have an account removed. Removing users from the scanner is not a security concern, it just keeps the address book uncluttered and free for new employees to be added, without which would add up over time.
Creating printer profiles
In a perfect world we would only use a single brand (and type) of printer, but realistically that is rarely the case. As was the case for me. What this meant is I needed to identify the different types of MFPs we use and build unique profiles for each of them. This was not as simple as just designating the login url, username and password. All of this is needed, yes, but each MFP will export or host the address book data differently. So far they have broken down into three different categories: the address book exports into a csv file, xml format, or it does not have that option at all and the data must be read from the web page itself in html.
So far I have built profiles for the following printers:
- HP LaserJet MFP Mxxx (Works on several models)
- SHARP MX 4070N
- SHARP MX 5070N
- SHARP MX 4141N
- SHARP MX 5141N
- SHARP BP 70C55
- Profiles I am still working on: KYOCERA CS 4501i, two TopAccess MFP models, and one other I forget the name of
The main script runs off a list of IP addresses and their printer models, using each profile when called upon. That main.py script can be found here.
Creating your own profiles / step by step process
If you need to create your own profile I would recommend using the method I have been using with success so far:
- Using Burp Suite, open the web portal for the printer
- Capture the POST request for the login page, keeping the session active for later access
- In the case of downloading a csv or xml file, identify the GET request used for the download
- In the case of no export options, curl the web page that displays the addresses in html, then build a function to sort through the data
- Validate the profile and move on to the next
Looking at one just one example - the SHARP MX-5070N
To begin, the entire script for this can be found here and it will be referenced throughout the below process. Now, open Burp Suite, navigate to Proxy > Intercept. Turn Intercept on, and select Open browser as seen below:

From that browser navigate to http://IP/login.html?/sysmgt_storagebackup_csv.html, forwarding all traffic in Burp Suite. That’ll land you on this page:
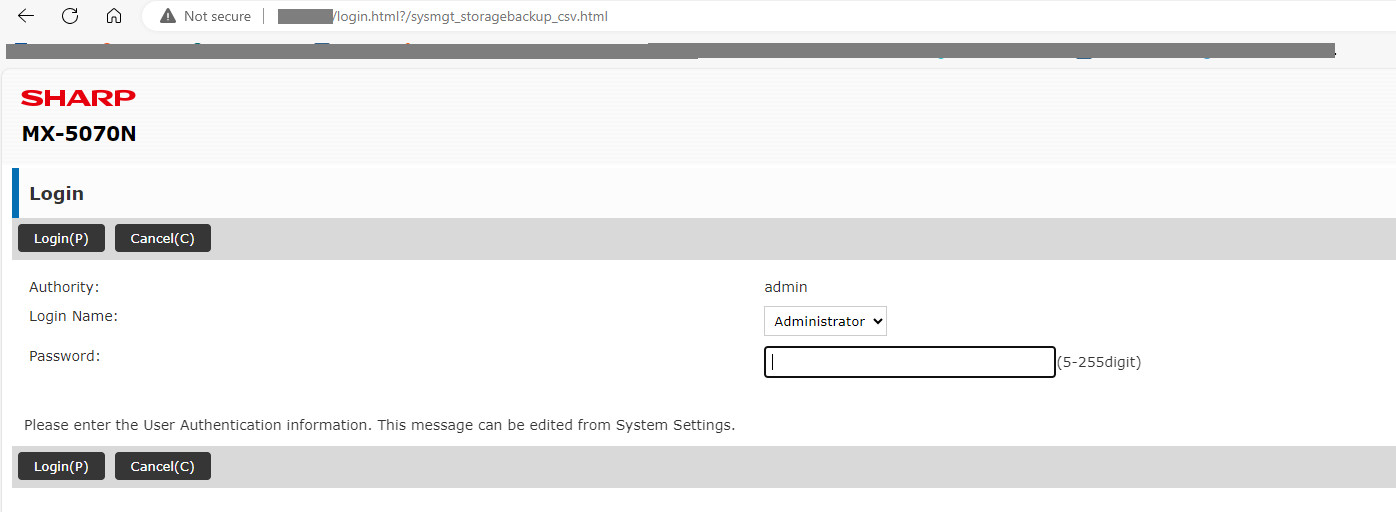
Entering the password (I used “testpassword” as seen in the image below) and pressing Login(P) should capture the POST request as follows:
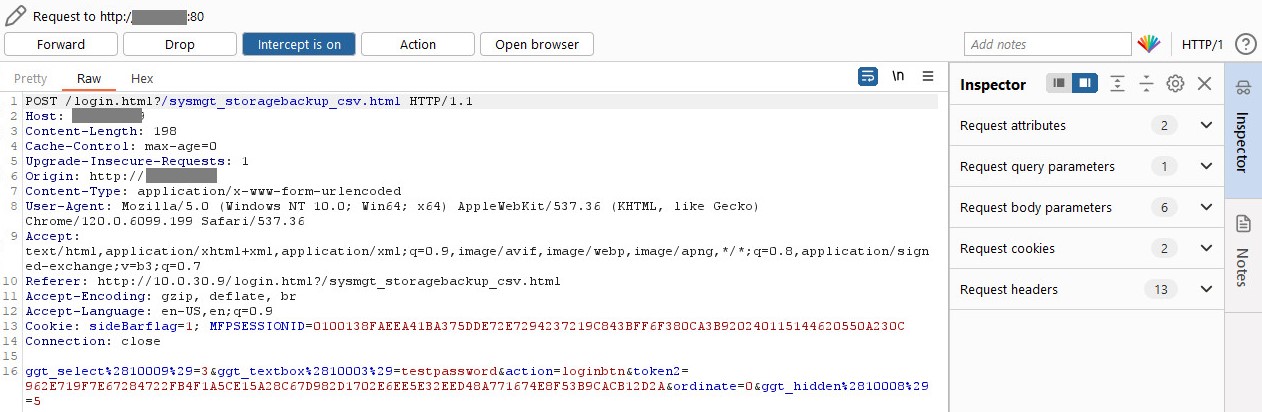
The POST request captures the payload we need to send in python. There are a bunch of other validation steps I do that I won’t touch on here, but the below code will let you emulate the login action:
login_url='http://'+str(ip)+'/login.html?/sysmgt_storagebackup_csv.html'
password = 'your_password'

#need to maintain session since we are logging in
session = requests.Session()
login_page_response = session.get(login_url)

login_data = {
    'ggt_select(10009)': '3',
    'ggt_textbox(10003)': password,
    'action': 'loginbtn',
    'token2': '',
    'ordinate': '0',
    'ggt_hidden(10008)': '5'
}

#Login now
login_response = session.post(login_url, data=login_data)
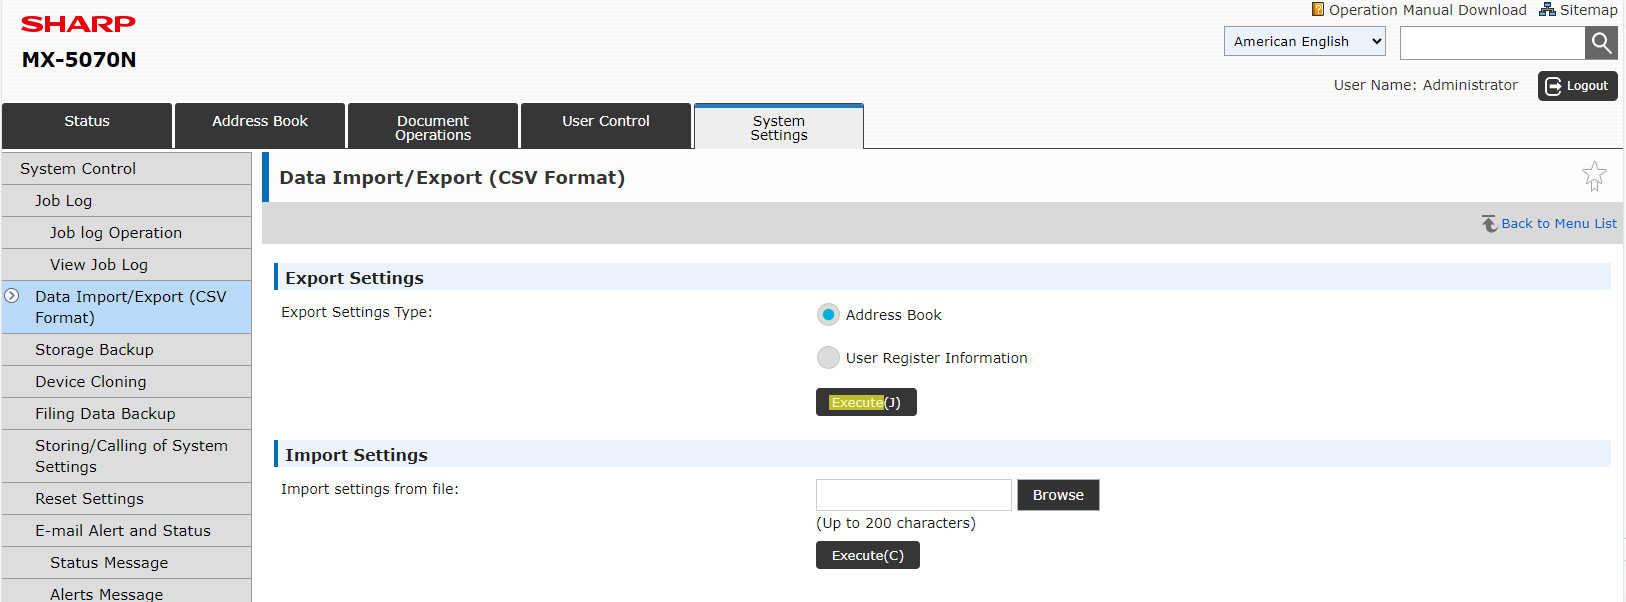
There are a couple of ways you can determine a successful login, the simplest among them is to look for some text that should appear in the login response. For me this was the word ‘Export’, but you could also do your checks by status code. Now that we are logged in with our session to the printer’s web portal, let’s look at the normal web page and inspect it for the that Execute (J) button:

Pressing that button from the browser opened in Burp Suite will capture another POST request, which I tried to replicate several times but the download never went through. That was when I realized I had failed html101 - we are trying to download a csv file, so regardless of the POST request we are waiting on the GET request that follows. Realizing this I went back to Burp Suite and after forwarding the POST request I noticed the follow-up GET request:

And there it is. Since we are already logged in with our session, we simply need to call the GET request in python and store that file somewhere locally. You don’t need to save the file, but it sure helps when first establishing new printer profiles during troubleshooting. Code below:
try_and_get=session.get('http://'+str(ip)+'/storage_backup_csv.html?type=33')

saveToFileName=str(ip.replace('.','_'))+'.csv'

if try_and_get.status_code==200:
    with open(base_folder+str(usedate)+'/'+saveToFileName,'w') as saveTo:
        saveTo.write(try_and_get.text)
    saveTo.close()
At this point you can open the CSV file with the csv module and parse through the data looking for those individuals stored in the address book by their name, ID, the network folder where files save to, etc. I’ve already done the work for this particular printer and set up the profile for it, you can reference the link in the beginning of this section to view it in full.
Summary
I’ll be building more profiles for more of our multifunction printers so that the process can be fully automated, and not just half way since that is where I am at right now. It’s a good side project for when things are slow. In time I might also expand this project to automate the removal of those users from the printers, but this would need to be heavily reviewed by myself and include about a million error checks. Last thing I want is to remove a bunch of users from the address book and need to go back in and add them all manually…