Introduction
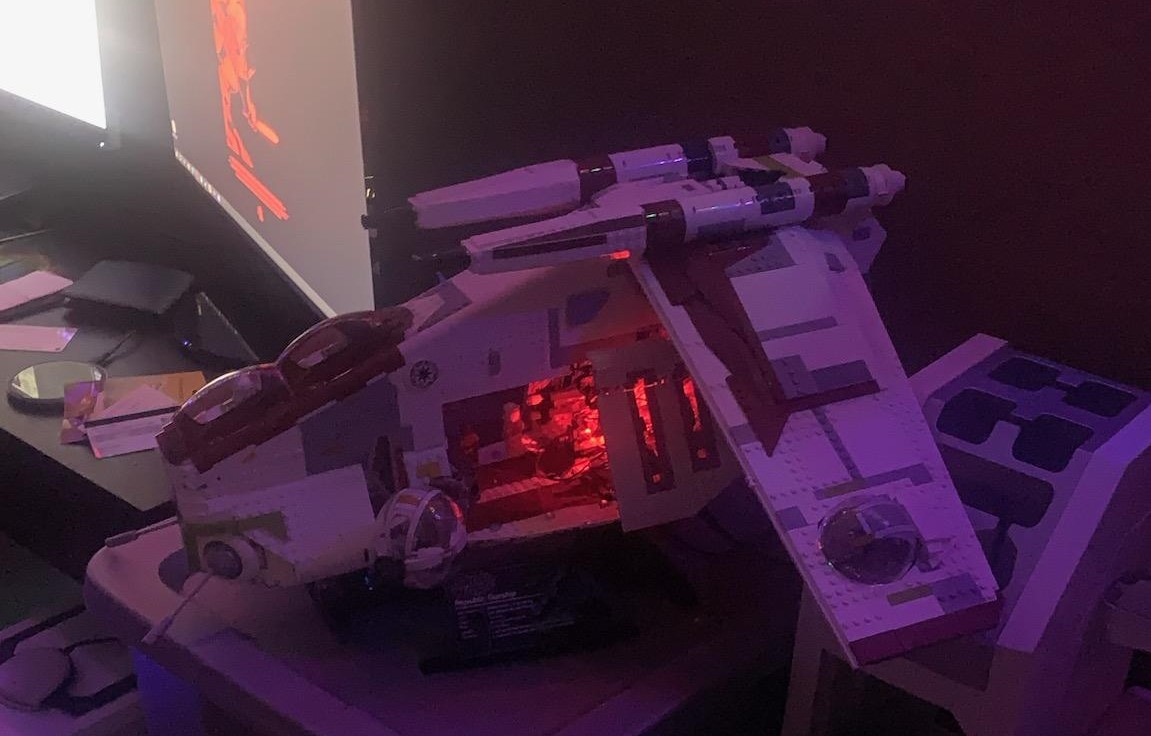
Well, my younger brother bought the new Lego Gunship and I had a spare microcontroller. Was it a financially irresponsible decision of him? Not for me to say. Is it a cool purchase? Yes, yes it is. We had the original version back in the day which makes it even better. Regardless of the backstory no one cares about, I had the idea to upgrade his gunship display with some lights and audio. I wish I had a few better pictures, but here is the final product:
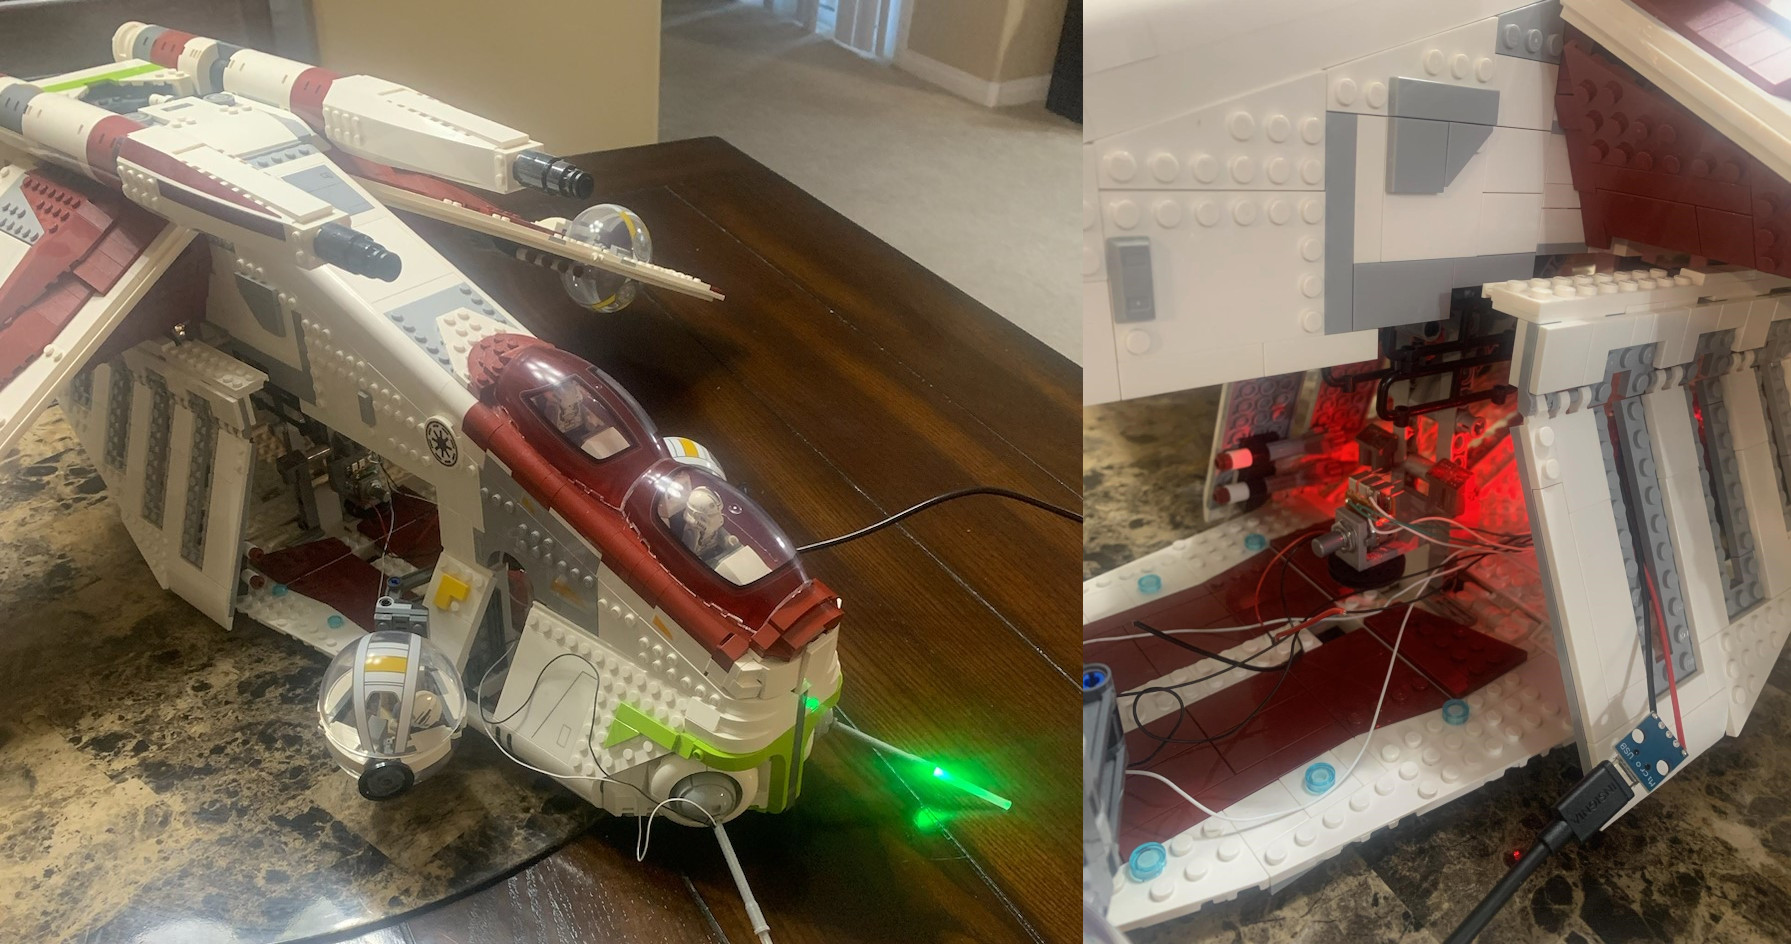
Gunship Display Electronics from Wesley Kent on Vimeo.
Hardware
- 1x Pi Pico
- 1x Button
- 1x SPDT Switch
- 1x PAM8302A Amplifier
- 1x 8 Ohm 0.5W speaker
- 1x 10K Log. Potentiometer
- 6x 220 Ohm resistors
- Some 3.5mm green, red and white LEDs
- 1x 3-Pos DPDT Switch
- Perfboard, 5cm x 7cm
- Micro USB Breakout (male and female ends)
- Wires, solder, soldering iron, etc.
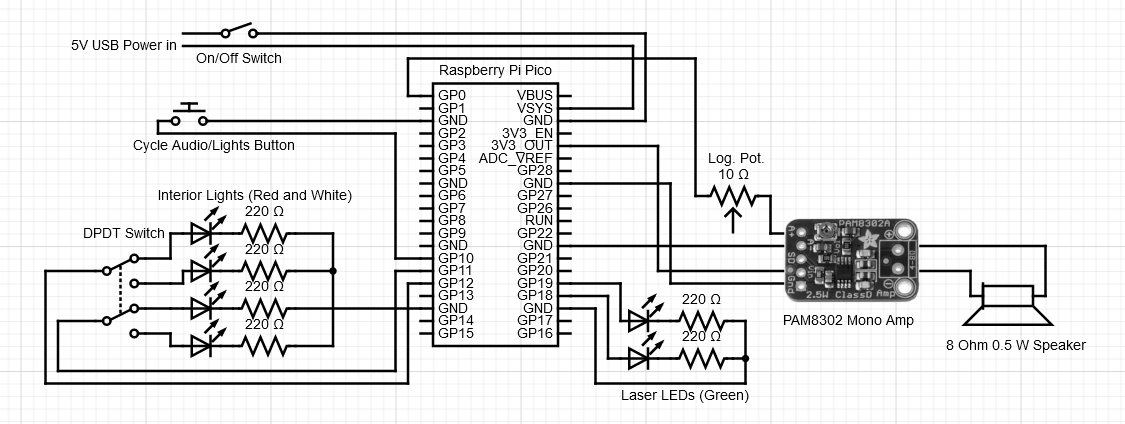
Circuit Diagram
For the record, I think this is right. I sort of shipped this off before I made the final circuit diagram, but using the script I was able to connect the dots well enough. Here it is:
3d files
I designed this using Matter Control and the three different sections fit where you would expect - if not, reference the above images. File below, and backup MXC can be found here:
*Disclaimer here: my brother said I actually messed up a bit and the studs need to all be shifted 4mm (or half a block over). If you have some spare lego pieces you can easily get around this, otherwise feel free to modify the file yourself. Not sure when this mistake happened…
Software
Configuring and interfacing with the microcontroller
Here is where I sort of dropped the ball. I’m writing this page a couple months after I first set this up and I did not document my steps. I do know the Pico board is using CircuitPython, and there are more than enough tutorials out there to get that installed. I had to go through four micro usb cables until I found one that had the data pins wired, so don’t be worried the Pico board is broken until you are using the right cable.
I do remember when you get that installed you can interface with it by going to your device manager, find which COM port it is loaded under, then use some software like PuTTY to open a serial connection with it.
The script itself
You can find the link to the entire script here here. It’s fairly short and self-explanatory, so I’ll just let you read through it on your own:
import board
import audiomp3
import audiopwmio
from time import sleep
import pwmio
import digitalio


#Front lasers
laserLED1 = digitalio.DigitalInOut(board.GP18)
laserLED1.direction = digitalio.Direction.OUTPUT
laserLED2 = digitalio.DigitalInOut(board.GP19)
laserLED2.direction = digitalio.Direction.OUTPUT
laserLED1.value = False
laserLED2.value = False


#Pulsing white/red LEDs in the interior
led = pwmio.PWMOut(board.GP11, frequency=1000)
led2 = pwmio.PWMOut(board.GP12, frequency=1000)
step = 250


#Just one button needed
button_pin = digitalio.DigitalInOut(board.GP10)
button_pin.switch_to_input(pull=digitalio.Pull.DOWN) #Pull DOWN - no resistors used


allAudio=["gunshipv2.mp3","ambientGunship.mp3","lasers.mp3","buryingTheDeadv2.mp3"]
num=3 #start with the lasers
filename=allAudio[num] #this is how we're gonna loop through them on button press


#Without this Leds can get stuck on when switching up audio files
def resetLEDs(led,led2,laserLED1,laserLED2):
    laserLED1.value = False
    laserLED2.value = False
    led.duty_cycle=0
    led2.duty_cycle=0


#damn this gets annoying on a constant loop, below will help with that
lasersNeedABreak=0


while True:

    audio = audiopwmio.PWMAudioOut(board.GP0)

    try:
        with open(filename, "rb") as audioFile:
            print("Loading audio: ",filename)
            decoder = audiomp3.MP3Decoder(audioFile)

            audio.play(decoder)

            while audio.playing:

                if button_pin.value:
                    sleep(2)

                    num+=1
                    if num>=len(allAudio):
                        num=0
                    filename=allAudio[num]

                    resetLEDs(led,led2,laserLED1,laserLED2)

                    lasersNeedABreak=0
                    break

                if filename == "lasers.mp3": #Green LEDs only in this instance

                    laserLED1.value = True
                    sleep(0.2)
                    laserLED1.value = False
                    laserLED2.value = True
                    sleep(0.2)
                    laserLED2.value = False

                else:

                    for cycle in range(0, 65536-step, step):
                        led.duty_cycle = cycle
                        led2.duty_cycle = cycle
                        sleep(0.005)
                    for cycle in range(65535, 1+step, -step):
                        led.duty_cycle = cycle
                        led2.duty_cycle = cycle
                        sleep(0.005)

    except:
        pass

    finally:
        audio.stop()
        audio.deinit()

        laserLED1.value = False
        laserLED2.value = False

        if filename=="lasers.mp3":
            lasersNeedABreak+=1

            if lasersNeedABreak>=2: #two loops sounded most natural
                lasersNeedABreak=0
                sleep(4)
Conclusion
Overall a fun project, easy to build, and fairly cheap - except for the gunship itself, that is. If you have any questions about this feel free to reach out and I’ll do my best to get back to you.