Introduction
Basically I wanted to use an Arduino Uno with a TFT LCD Shield and the on-board MicroSD card reader. I found several web pages and tutorials that did not work, sometimes they used outdated libraries, other times I just could not get it working. So after a good amount of internet research and ChatGPT I was able to put together the script you can view here. The end result is a simple LCD that will render images one after the other from the on-board MicroSD card, and while the video shows only two images being looped the sky’s the limit:
Arduino Uno + 3.5" TFT LCD Module + SD card from Wesley Kent on Vimeo.
Hardware
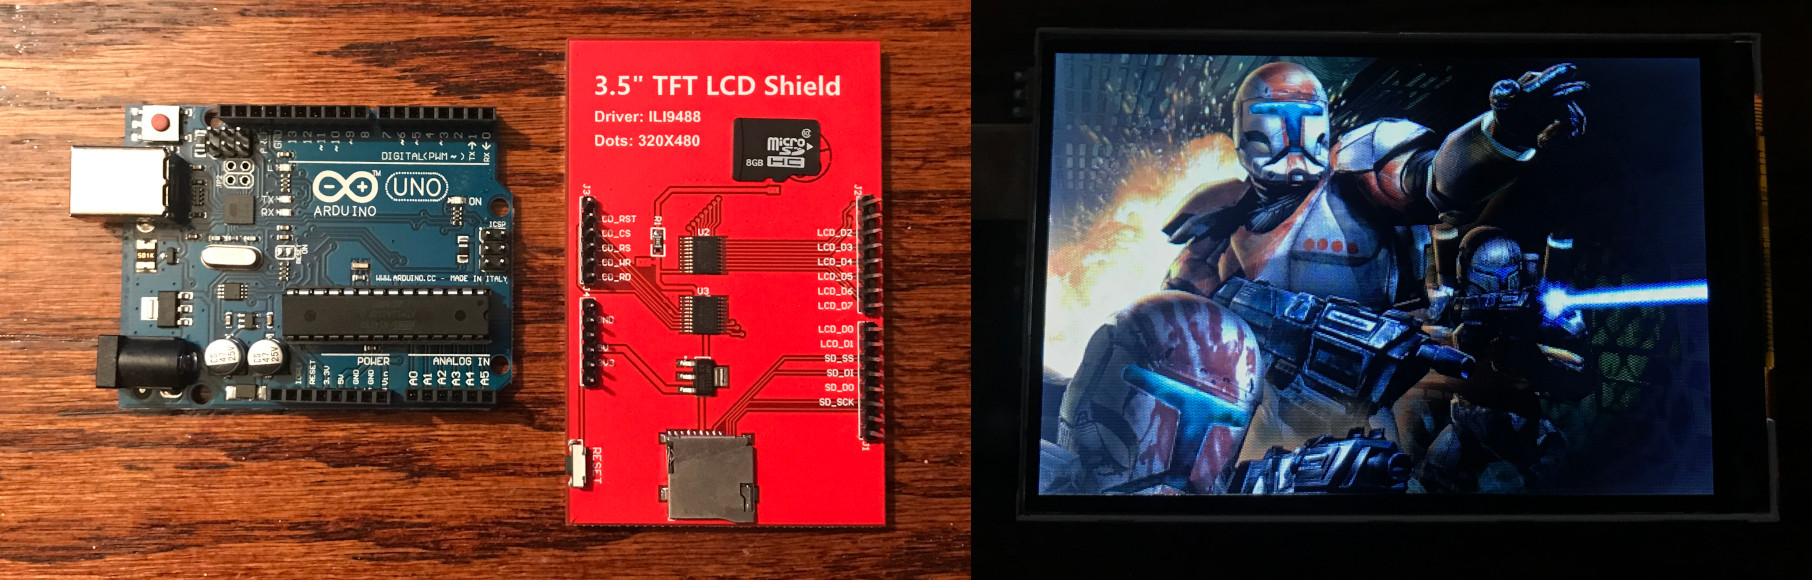
- 1x Arduino Uno R3
- 1x 3.5” TFT LCD Module 480x320 with the ILI9488 Controller
- 1x MicroSD Card (any size, really - you’re just storing images)
- 1x USB Type B Cable
Image format and storage
The way this script works is it reads bitmap files from the MicroSD card reader on-board the LCD module. First off, format the MicroSD card to Fat32 - on Windows this can be done by using the “Format” option after right clicking on the drive or go the diskpart route using the command prompt. The images need to be saved in bitmap (.bmp) format, as 24-bit, and the images should be 480x320 in size. This is done easily enough with Gimp, just make sure you expand the Advanced Options to select the correct 24-bit option. If you need a working example of some images to test against, reference this directory here.
Modifying the script
Since everyone has their own intent / application with a project like this you’ll likely need to modify the script a bit. If you only want to display a single picture this can be done easily enough by modifying the Fillscreen() function by removing the loop and rendering just a single image from the MicroSD card, or simply upload a single image to the SD card. Your best friend is just going to be using the Serial Monitor on the Arduino IDE and troubleshooting from there. Best of luck.
The script in full
Again, you can use the link from here to get to the script, or just copy and paste below:
#define LCD_CS 33
#define LCD_CD 15
#define LCD_WR 4
#define LCD_RD 2
#define LCD_RESET 32

#include <SD.h>
#define sd_cs  10

#include <SPI.h>
#include "Adafruit_GFX.h"
#include <MCUFRIEND_kbv.h>
MCUFRIEND_kbv tft;

#define	BLACK   0x0000
#define WHITE   0xFFFF

#ifndef min
#define min(a, b) (((a) < (b)) ? (a) : (b))
#endif

void setup(void);
void loop(void);
unsigned long FillScreen();

uint16_t g_identifier;
extern const uint8_t hanzi[];

void setup(void) {
	Serial.begin(9600);
	uint32_t when = millis();

	if (!Serial) delay(5000);
	Serial.println("Serial took " + String((millis() - when)) + "ms to start");

	uint16_t ID = tft.readID();
	Serial.print("ID = 0x");
	Serial.println(ID, HEX);
	if (ID == 0xD3D3) ID = 0x9481;
	tft.begin(ID);

	if (!SD.begin(sd_cs)) {
		Serial.println("Well it failed but fuck it just keep going.");
	}

	Serial.println("Initialization done.");
}

void printmsg(int row, const char *msg)
{
	tft.setTextColor(WHITE, BLACK);
	tft.setCursor(0, row);
	tft.println(msg);
}

void loop(void) {
	uint8_t aspect;
	uint16_t pixel;
	const char *aspectname[] = {
		"PORTRAIT", "LANDSCAPE", "PORTRAIT_REV", "LANDSCAPE_REV"
	};
	const char *colorname[] = { "BLUE", "GREEN", "RED", "GRAY" };
	uint16_t colormask[] = { 0x001F, 0x07E0, 0xF800, 0xFFFF };
	uint16_t dx, rgb, n, wid, ht, msglin;
	tft.setRotation(180);
	FillScreen();
	delay(100);

	tft.invertDisplay(false);
	delay(100);
	tft.invertDisplay(false);
}

unsigned long FillScreen() {

	File root = SD.open("/");
	if (!root) {
		Serial.println("Failed to open sd card / its directory");
		return;
	} else {
		Serial.print("NO ERRORS, thank god");
	}

	while (true) {
		File entry = root.openNextFile();
		if (!entry) {
			break;
		}

		if (strstr(entry.name(), ".BMP") != NULL) {
			drawBMP(entry.name());
		}
		entry.close();
		delay(50);
	}
	root.close();
}


void drawBMP(const char *filename) {
	File bmpFile = SD.open(filename);

	if (!bmpFile) {
		Serial.println("Error opening the BMP file");
		return;
	}

	uint32_t fileSize = bmpFile.size();
	uint16_t imgOffset = 135; //Needed to adjust this for whatever reason from 0
	bmpFile.seek(18);
	uint32_t imgWidth = bmpFile.read() | (bmpFile.read() << 8) | (bmpFile.read() << 16) | (bmpFile.read() << 24);
	uint32_t imgHeight = bmpFile.read() | (bmpFile.read() << 8) | (bmpFile.read() << 16) | (bmpFile.read() << 24);

	// Adjust starting coordinates
	int startX = (tft.width() - imgWidth) / 2 ;  // Center the image horizontally
	int startY = (tft.height() - imgHeight) / 2;  // Center the image vertically

	// Draw BMP image pixel by pixel
	for (int y = 0; y < imgHeight; y++) {
		for (int x = 0; x < imgWidth; x++) {
			bmpFile.seek(imgOffset + (x + (imgHeight - 1 - y) * imgWidth) * 3);
			uint8_t blue = bmpFile.read();
			uint8_t green = bmpFile.read();
			uint8_t red = bmpFile.read();
			uint16_t color = tft.color565(red, green, blue);
			tft.drawPixel(startX + x, startY + y, color);
		}
	}

	bmpFile.close();
}